AWS VPC CNI plugin
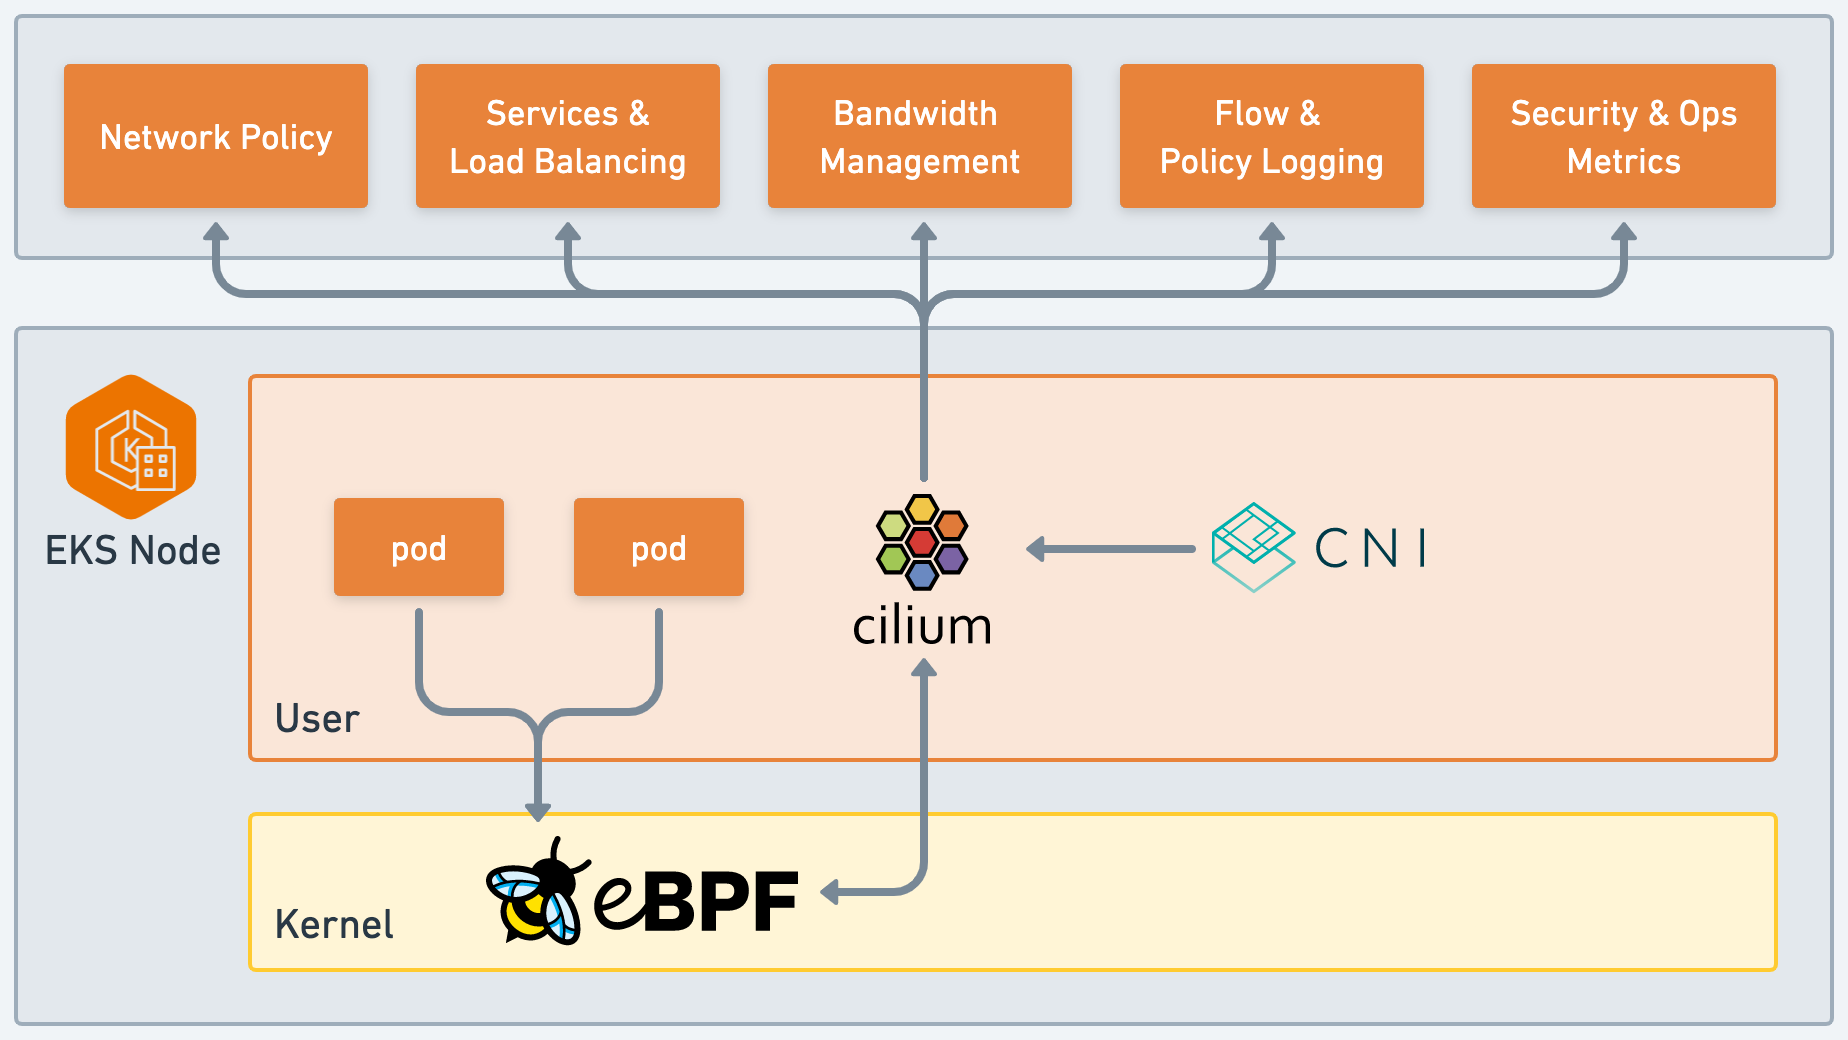
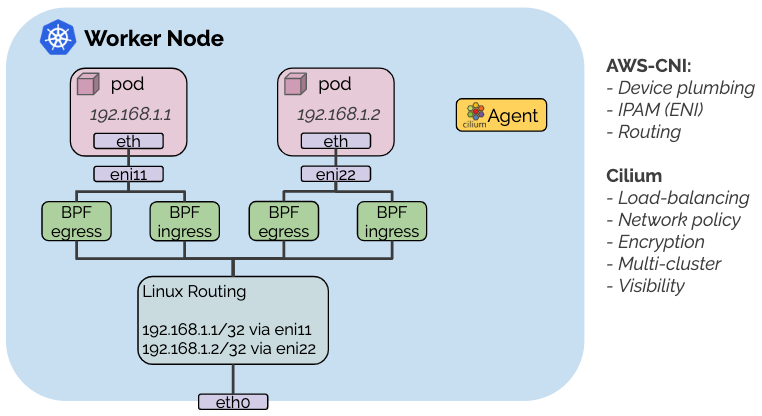
This guide explains how to set up Cilium in combination with the AWS VPC CNI plugin. In this hybrid mode, the AWS VPC CNI plugin is responsible for setting up the virtual network devices as well as for IP address management (IPAM) via ENIs. After the initial networking is setup for a given pod, the Cilium CNI plugin is called to attach eBPF programs to the network devices set up by the AWS VPC CNI plugin in order to enforce network policies, perform load-balancing and provide encryption.
Note
Some advanced Cilium features may be limited when chaining with other CNI plugins, such as:
Video
If you require advanced features of Cilium, consider migrating fully to Cilium. To help you with the process, you can watch two Principal Engineers at Meltwater talk about how they migrated Meltwater’s production Kubernetes clusters - from the AWS VPC CNI plugin to Cilium.
Important
Please ensure that you are running version 1.11.2 or newer of the AWS VPC CNI plugin to guarantee compatibility with Cilium.
$ kubectl -n kube-system get ds/aws-node -o json | jq -r '.spec.template.spec.containers[0].image'
602401143452.dkr.ecr.us-west-2.amazonaws.com/amazon-k8s-cni:v1.11.2
If you are running an older version, as in the above example, you can upgrade it with:
$ kubectl apply -f https://raw.githubusercontent.com/aws/amazon-vpc-cni-k8s/release-1.11/config/master/aws-k8s-cni.yaml
Setting up a cluster on AWS
Follow the instructions in the Cilium Quick Installation guide to set up an EKS cluster, or use any other method of your preference to set up a Kubernetes cluster on AWS.
Ensure that the aws-vpc-cni-k8s plugin is installed — which will already be the case if you have created an EKS cluster. Also, ensure the version of the plugin is up-to-date as per the above.
Download the Cilium release tarball and change to the kubernetes install directory:
curl -LO https://github.com/cilium/cilium/archive/main.tar.gz
tar xzf main.tar.gz
cd cilium-main/install/kubernetes
Deploy Cilium via Helm:
helm install cilium ./cilium \
   --namespace kube-system \
   --set cni.chainingMode=aws-cni \
   --set cni.exclusive=false \
   --set enableIPv4Masquerade=false \
   --set routingMode=native
This will enable chaining with the AWS VPC CNI plugin. It will also disable tunneling, as it’s not required since ENI IP addresses can be directly routed in the VPC. For the same reason, masquerading can be disabled as well.
Restart existing pods
The new CNI chaining configuration will not apply to any pod that is already running in the cluster. Existing pods will be reachable, and Cilium will load-balance to them, but not from them. Policy enforcement will also not be applied. For these reasons, you must restart these pods so that the chaining configuration can be applied to them.
The following command can be used to check which pods need to be restarted:
for ns in $(kubectl get ns -o jsonpath='{.items[*].metadata.name}'); do
     ceps=$(kubectl -n "${ns}" get cep \
         -o jsonpath='{.items[*].metadata.name}')
     pods=$(kubectl -n "${ns}" get pod \
         -o custom-columns=NAME:.metadata.name,NETWORK:.spec.hostNetwork \
         | grep -E '\s(<none>|false)' | awk '{print $1}' | tr '\n' ' ')
     ncep=$(echo "${pods} ${ceps}" | tr ' ' '\n' | sort | uniq -u | paste -s -d ' ' -)
     for pod in $(echo $ncep); do
       echo "${ns}/${pod}";
     done
done
Validate the Installation
Install the latest version of the Cilium CLI. The Cilium CLI can be used to install Cilium, inspect the state of a Cilium installation, and enable/disable various features (e.g. clustermesh, Hubble).
CILIUM_CLI_VERSION=$(curl -s https://raw.githubusercontent.com/cilium/cilium-cli/main/stable.txt)
CLI_ARCH=amd64
if [ "$(uname -m)" = "aarch64" ]; then CLI_ARCH=arm64; fi
curl -L --fail --remote-name-all https://github.com/cilium/cilium-cli/releases/download/${CILIUM_CLI_VERSION}/cilium-linux-${CLI_ARCH}.tar.gz{,.sha256sum}
sha256sum --check cilium-linux-${CLI_ARCH}.tar.gz.sha256sum
sudo tar xzvfC cilium-linux-${CLI_ARCH}.tar.gz /usr/local/bin
rm cilium-linux-${CLI_ARCH}.tar.gz{,.sha256sum}
CILIUM_CLI_VERSION=$(curl -s https://raw.githubusercontent.com/cilium/cilium-cli/main/stable.txt)
CLI_ARCH=amd64
if [ "$(uname -m)" = "arm64" ]; then CLI_ARCH=arm64; fi
curl -L --fail --remote-name-all https://github.com/cilium/cilium-cli/releases/download/${CILIUM_CLI_VERSION}/cilium-darwin-${CLI_ARCH}.tar.gz{,.sha256sum}
shasum -a 256 -c cilium-darwin-${CLI_ARCH}.tar.gz.sha256sum
sudo tar xzvfC cilium-darwin-${CLI_ARCH}.tar.gz /usr/local/bin
rm cilium-darwin-${CLI_ARCH}.tar.gz{,.sha256sum}
See the full page of releases.
Clone the Cilium GitHub repository so that the Cilium CLI can access the latest unreleased Helm chart from the main branch:
git clone git@github.com:cilium/cilium.git
cd cilium
To validate that Cilium has been properly installed, you can run
$ cilium status --wait
   /¯¯\
/¯¯\__/¯¯\    Cilium:         OK
\__/¯¯\__/    Operator:       OK
/¯¯\__/¯¯\    Hubble:         disabled
\__/¯¯\__/    ClusterMesh:    disabled
   \__/

DaemonSet         cilium             Desired: 2, Ready: 2/2, Available: 2/2
Deployment        cilium-operator    Desired: 2, Ready: 2/2, Available: 2/2
Containers:       cilium-operator    Running: 2
                  cilium             Running: 2
Image versions    cilium             quay.io/cilium/cilium:v1.9.5: 2
                  cilium-operator    quay.io/cilium/operator-generic:v1.9.5: 2
Run the following command to validate that your cluster has proper network connectivity:
$ cilium connectivity test
ℹ️  Monitor aggregation detected, will skip some flow validation steps
✨ [k8s-cluster] Creating namespace for connectivity check...
(...)
---------------------------------------------------------------------------------------------------------------------
📋 Test Report
---------------------------------------------------------------------------------------------------------------------
✅ 69/69 tests successful (0 warnings)
Note
The connectivity test may fail to deploy due to too many open files in one
or more of the pods. If you notice this error, you can increase the
inotify resource limits on your host machine (see
Pod errors due to “too many open files”).
Congratulations! You have a fully functional Kubernetes cluster with Cilium. 🎉
You can monitor as Cilium and all required components are being installed:
$ kubectl -n kube-system get pods --watch
NAME                                    READY   STATUS              RESTARTS   AGE
cilium-operator-cb4578bc5-q52qk         0/1     Pending             0          8s
cilium-s8w5m                            0/1     PodInitializing     0          7s
coredns-86c58d9df4-4g7dd                0/1     ContainerCreating   0          8m57s
coredns-86c58d9df4-4l6b2                0/1     ContainerCreating   0          8m57s
It may take a couple of minutes for all components to come up:
cilium-operator-cb4578bc5-q52qk         1/1     Running   0          4m13s
cilium-s8w5m                            1/1     Running   0          4m12s
coredns-86c58d9df4-4g7dd                1/1     Running   0          13m
coredns-86c58d9df4-4l6b2                1/1     Running   0          13m
You can deploy the “connectivity-check” to test connectivity between pods. It is recommended to create a separate namespace for this.
kubectl create ns cilium-test
Deploy the check with:
kubectl apply -n cilium-test -f https://raw.githubusercontent.com/cilium/cilium/HEAD/examples/kubernetes/connectivity-check/connectivity-check.yaml
It will deploy a series of deployments which will use various connectivity paths to connect to each other. Connectivity paths include with and without service load-balancing and various network policy combinations. The pod name indicates the connectivity variant and the readiness and liveness gate indicates success or failure of the test:
$ kubectl get pods -n cilium-test
NAME                                                     READY   STATUS    RESTARTS   AGE
echo-a-76c5d9bd76-q8d99                                  1/1     Running   0          66s
echo-b-795c4b4f76-9wrrx                                  1/1     Running   0          66s
echo-b-host-6b7fc94b7c-xtsff                             1/1     Running   0          66s
host-to-b-multi-node-clusterip-85476cd779-bpg4b          1/1     Running   0          66s
host-to-b-multi-node-headless-dc6c44cb5-8jdz8            1/1     Running   0          65s
pod-to-a-79546bc469-rl2qq                                1/1     Running   0          66s
pod-to-a-allowed-cnp-58b7f7fb8f-lkq7p                    1/1     Running   0          66s
pod-to-a-denied-cnp-6967cb6f7f-7h9fn                     1/1     Running   0          66s
pod-to-b-intra-node-nodeport-9b487cf89-6ptrt             1/1     Running   0          65s
pod-to-b-multi-node-clusterip-7db5dfdcf7-jkjpw           1/1     Running   0          66s
pod-to-b-multi-node-headless-7d44b85d69-mtscc            1/1     Running   0          66s
pod-to-b-multi-node-nodeport-7ffc76db7c-rrw82            1/1     Running   0          65s
pod-to-external-1111-d56f47579-d79dz                     1/1     Running   0          66s
pod-to-external-fqdn-allow-google-cnp-78986f4bcf-btjn7   1/1     Running   0          66s
Note
If you deploy the connectivity check to a single node cluster, pods that check multi-node
functionalities will remain in the Pending state. This is expected since these pods
need at least 2 nodes to be scheduled successfully.
Once done with the test, remove the cilium-test namespace:
kubectl delete ns cilium-test
Advanced
Enabling security groups for pods (EKS)
Cilium can be used alongside the security groups for pods feature of EKS in supported clusters when running in chaining mode. Follow the instructions below to enable this feature:
Make sure that the AmazonEKSVPCResourceController managed policy is attached
to the IAM role associated with the EKS cluster:
export EKS_CLUSTER_NAME="my-eks-cluster" # Change accordingly
export EKS_CLUSTER_ROLE_NAME=$(aws eks describe-cluster \
     --name "${EKS_CLUSTER_NAME}" \
     | jq -r '.cluster.roleArn' | awk -F/ '{print $NF}')
aws iam attach-role-policy \
     --policy-arn arn:aws:iam::aws:policy/AmazonEKSVPCResourceController \
     --role-name "${EKS_CLUSTER_ROLE_NAME}"
Then, as mentioned above, make sure that the version of the AWS VPC CNI plugin running in the cluster is up-to-date:
kubectl -n kube-system get ds/aws-node \
  -o jsonpath='{.spec.template.spec.containers[0].image}'
602401143452.dkr.ecr.us-west-2.amazonaws.com/amazon-k8s-cni:v1.7.10
Next, patch the kube-system/aws-node DaemonSet in order to enable security
groups for pods:
kubectl -n kube-system patch ds aws-node \
  -p '{"spec":{"template":{"spec":{"initContainers":[{"env":[{"name":"DISABLE_TCP_EARLY_DEMUX","value":"true"}],"name":"aws-vpc-cni-init"}],"containers":[{"env":[{"name":"ENABLE_POD_ENI","value":"true"}],"name":"aws-node"}]}}}}'
kubectl -n kube-system rollout status ds aws-node
After the rollout is complete, all nodes in the cluster should have the vps.amazonaws.com/has-trunk-attached label set to true:
kubectl get nodes -L vpc.amazonaws.com/has-trunk-attached
NAME                                            STATUS   ROLES    AGE   VERSION              HAS-TRUNK-ATTACHED
ip-192-168-111-169.eu-west-2.compute.internal   Ready    <none>   22m   v1.19.6-eks-49a6c0   true
ip-192-168-129-175.eu-west-2.compute.internal   Ready    <none>   22m   v1.19.6-eks-49a6c0   true
From this moment everything should be in place. For details on how to actually associate security groups to pods, please refer to the official documentation.