Installation using Rancher
Introduction
If you’re not using the Rancher Management Console/UI to install your clusters, head over to the installation guides for standalone RKE clusters.
Rancher comes with official support for Cilium. For most Rancher users, that’s the recommended way to use Cilium on Rancher-managed clusters.
However, as Rancher is using a custom
rke2-cilium Helm chart
with independent release cycles, Cilium power-users might want to use an
out-of-band Cilium installation instead, based on the official
Cilium Helm chart,
on top of their Rancher-managed RKE2 downstream clusters.
This guide explains how to achieve this.
Note
This guide only shows a step-by-step guide for Rancher-managed (non-standalone) RKE2 clusters.
Note
This guide shows how to install Cilium on Rancher-managed Custom Clusters. However, this method also applies to clusters created with providers such as VMware vSphere.
Prerequisites
Fully functioning Rancher Version 2.x instance
At least one empty Linux VM, to be used as initial downstream “Custom Cluster” (Control Plane) node
DNS record pointing to the Kubernetes API of the downstream “Custom Cluster” Control Plane node(s) or L4 load-balancer
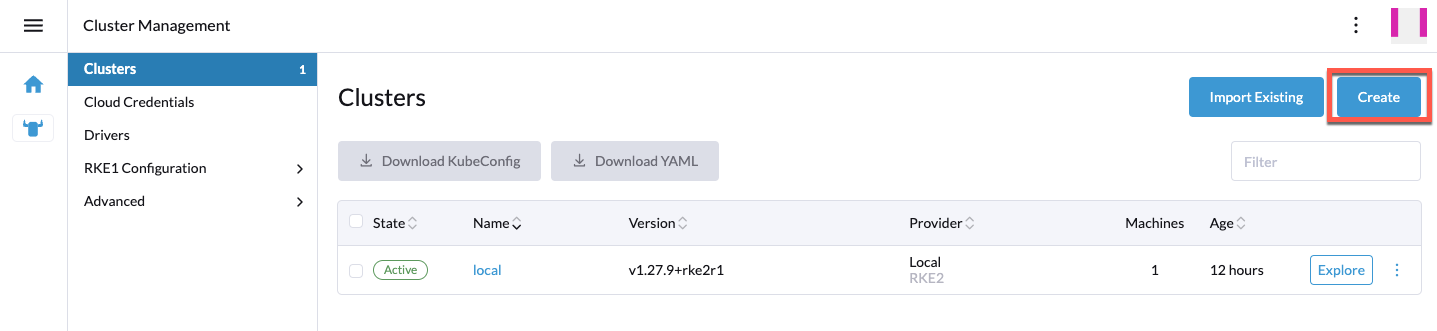
Create a New Cluster
In Rancher UI, navigate to the Cluster Management page. In the top right, click on the
Create button to create a new cluster.
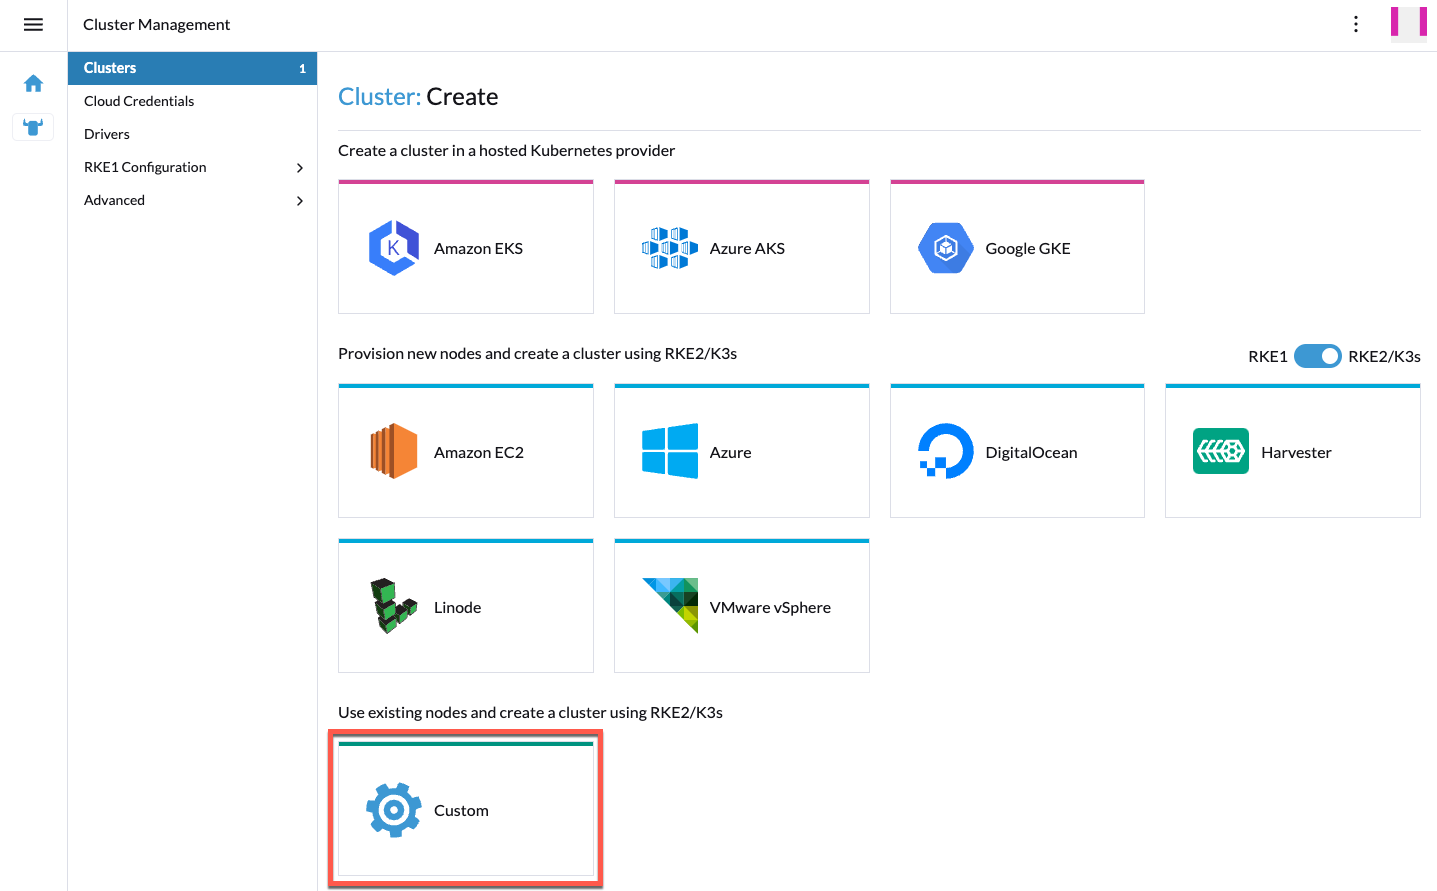
On the Cluster creation page select to create a new Custom cluster:
When the Create Custom page opens, provide a name for the cluster.
In the same Basics section, expand Container Network drop down list and select none.
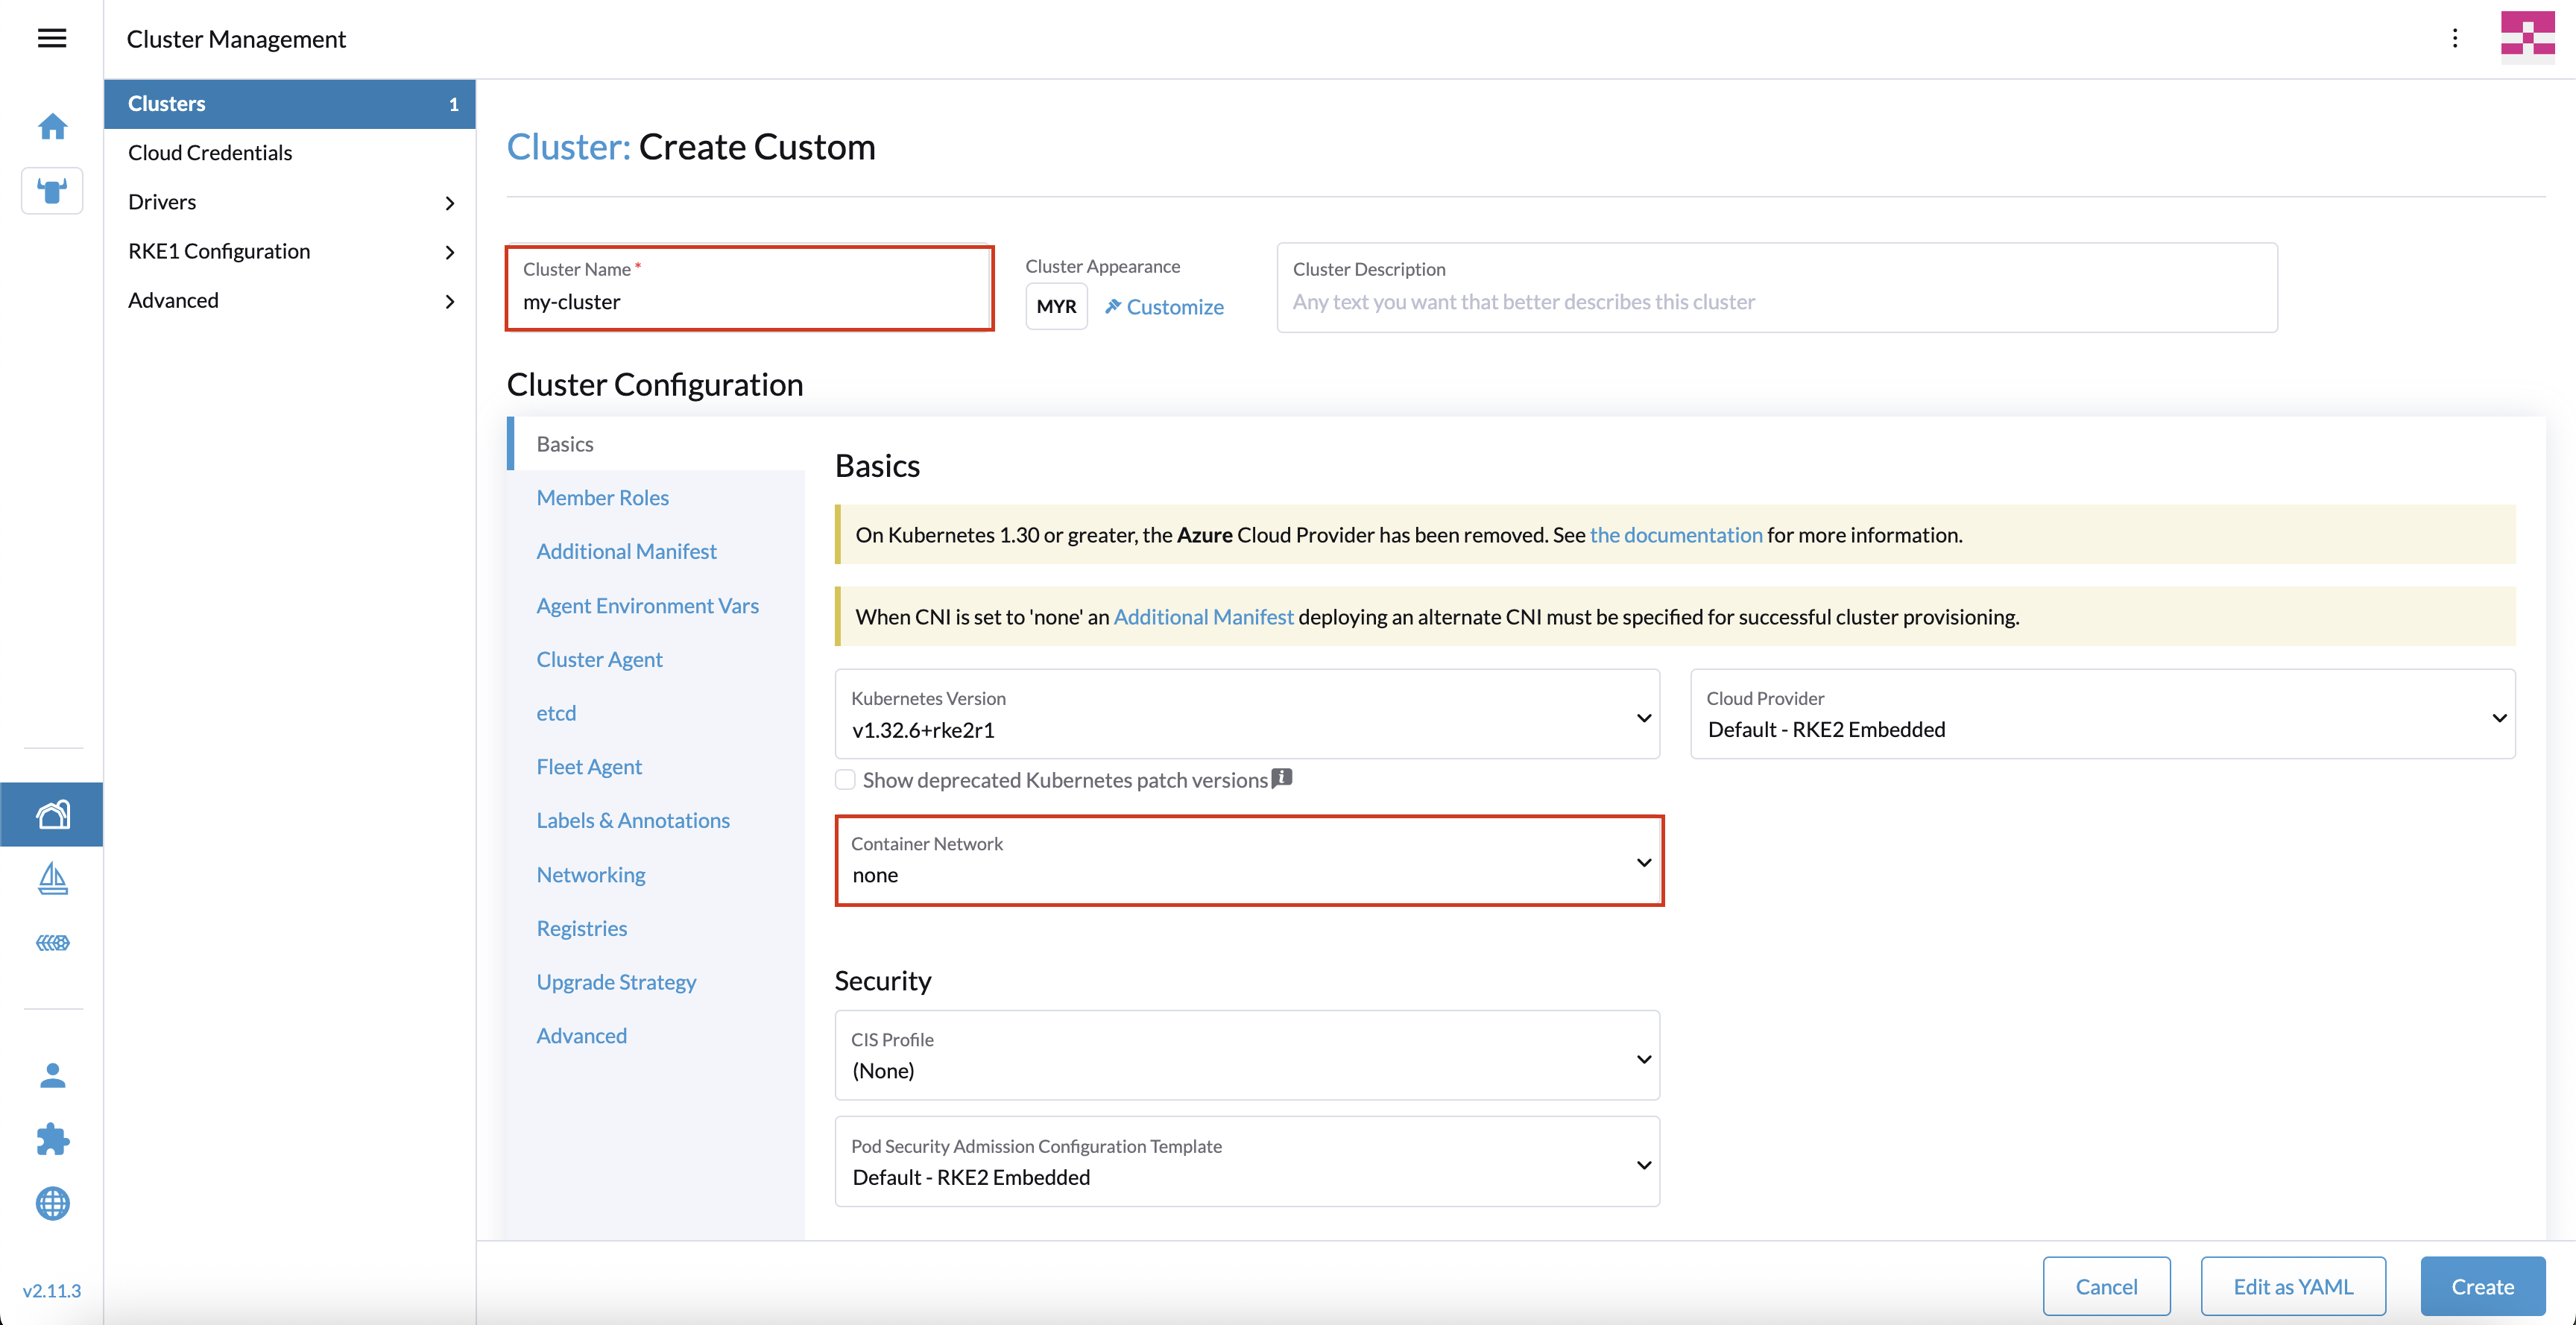
Go through the other configuration options and configure the ones that are relevant for your setup.
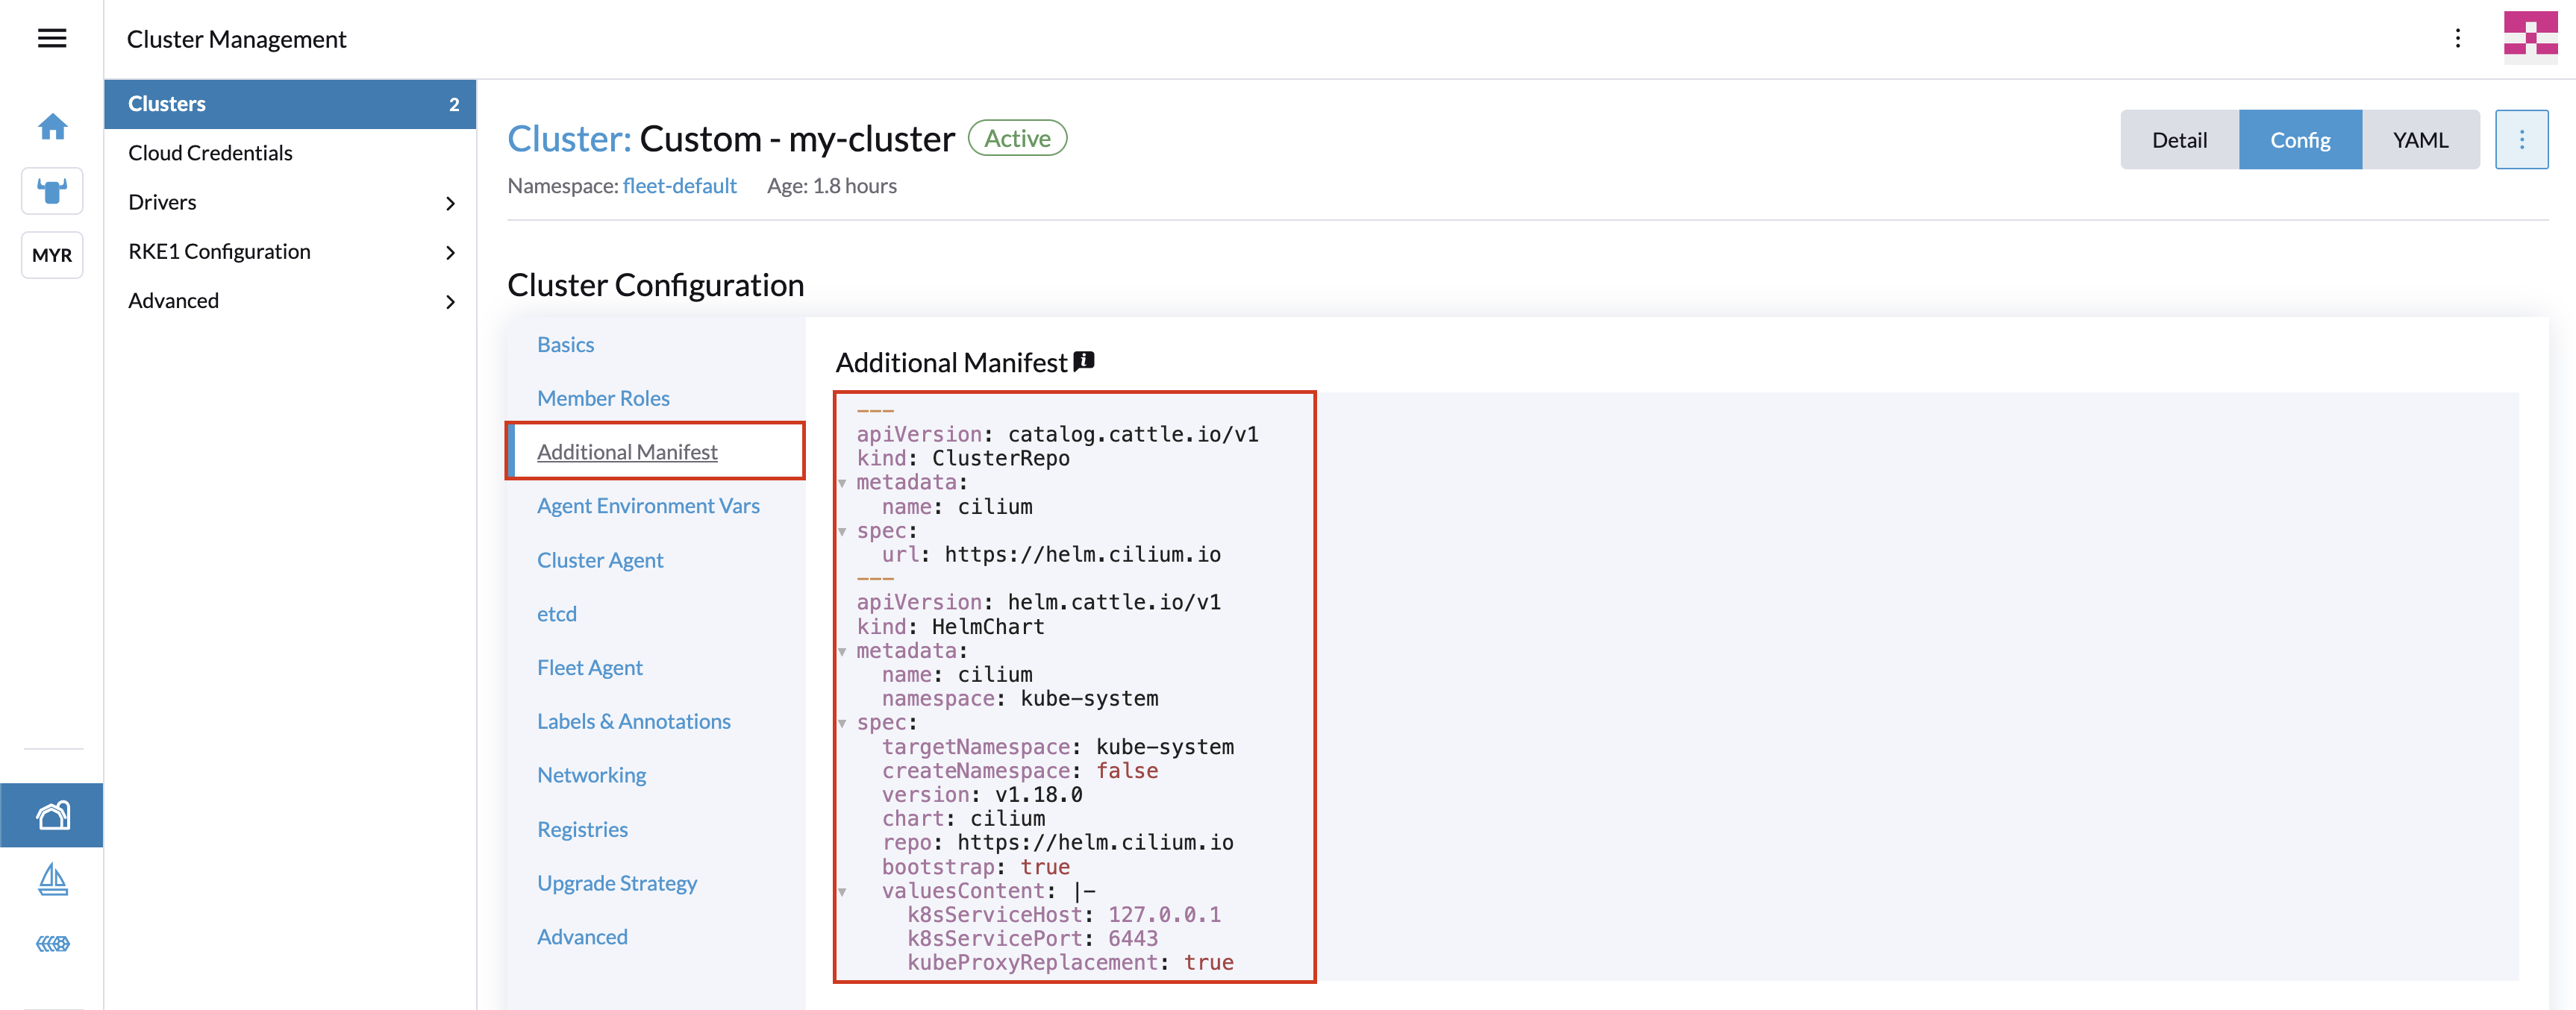
Add HelmChart manifests to install Cilium using the RKE2 built-in Helm Operator.
Go to the Additional Manifests section and paste the following YAML. Add relevant values for your Cilium installation.
apiVersion: catalog.cattle.io/v1
kind: ClusterRepo
metadata:
  name: cilium
spec:
  url: https://helm.cilium.io
apiVersion: helm.cattle.io/v1
kind: HelmChart
metadata:
  name: cilium
  namespace: kube-system
spec:
  targetNamespace: kube-system
  createNamespace: false
  version: v1.18.0
  chart: cilium
  repo: https://helm.cilium.io
  bootstrap: true
  valuesContent: |-
    # paste your Cilium values here:
    k8sServiceHost: 127.0.0.1
    k8sServicePort: 6443
    kubeProxyReplacement: true
Note
k8sServiceHost should be set to 127.0.0.1 and k8sServicePort to 6443. Cilium Agent running on control plane nodes will use local address for communication with Kubernetes API process.
On Control Plane nodes you can verify this by running:
$ sudo ss -tulpn | grep 6443
tcp   LISTEN 0      4096                 *:6443             *:*    users:(("kube-apiserver",pid=124481,fd=3))
While On worker nodes, Cilium Agent will use the local address to communicate with rke2 process, which is listening on port 6443. The process rke2 proxies requests to the Kubernetes API server running on the Control Plane node(s):
$ sudo ss -tulpn | grep 6443
tcp   LISTEN 0      4096         127.0.0.1:6443       0.0.0.0:*    users:(("rke2",pid=113574,fd=8))
Click the Edit as YAML box at the bottom of the page.
The cluster configuration will open in an editor within the window.
Within the Cluster Custom Resource (provisioning.cattle.io/v1),
verify the rkeConfig section. It should consist of the manifests that you added to the Additional Manifests section.
If you like to disable the default kube-proxy and your Cilium configuration enables Kube-Proxy Replacement, check the spec.rkeConfig.machineGlobalConfig section and set
spec.rkeConfig.machineGlobalConfig.disable-kube-proxy to true.
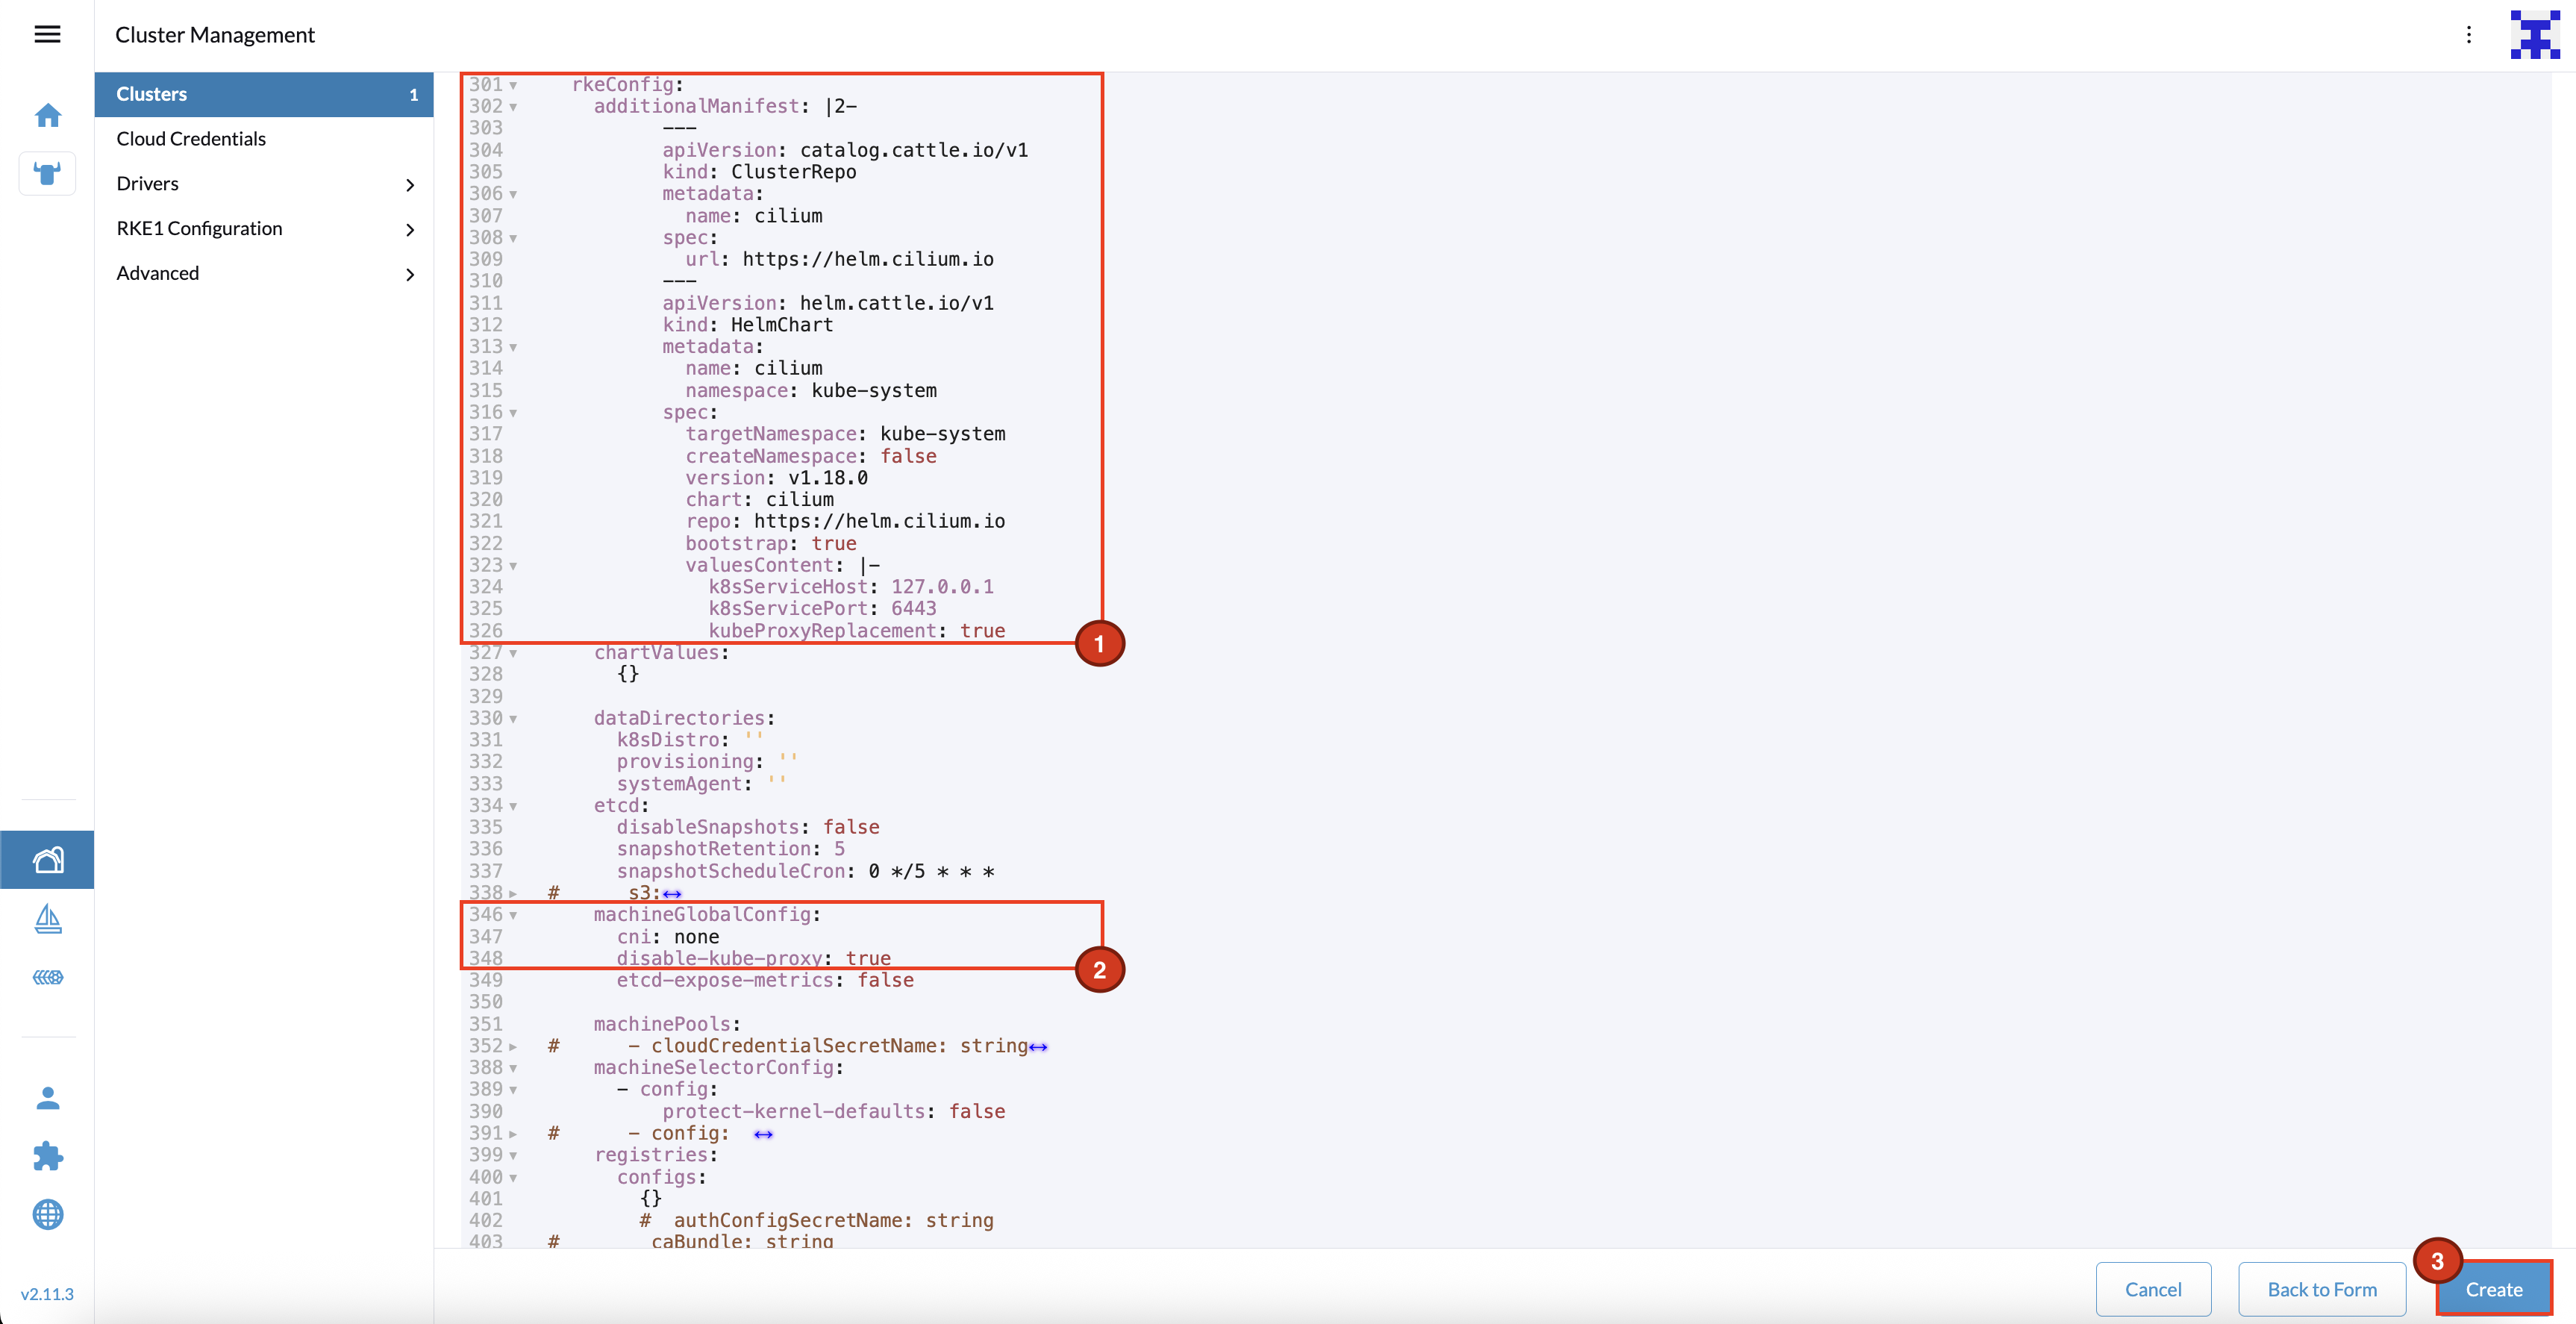
When you are ready, click Create and Rancher will create the cluster.
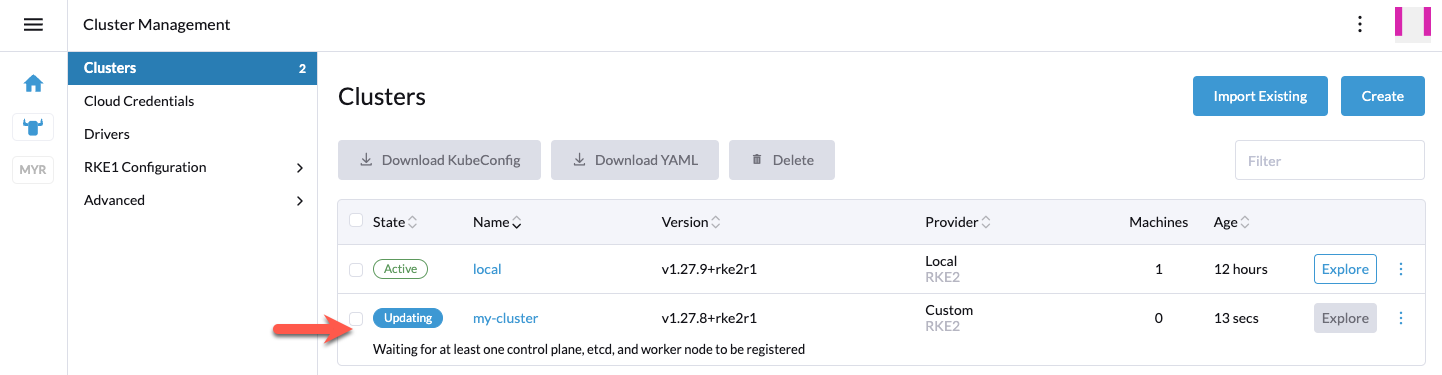
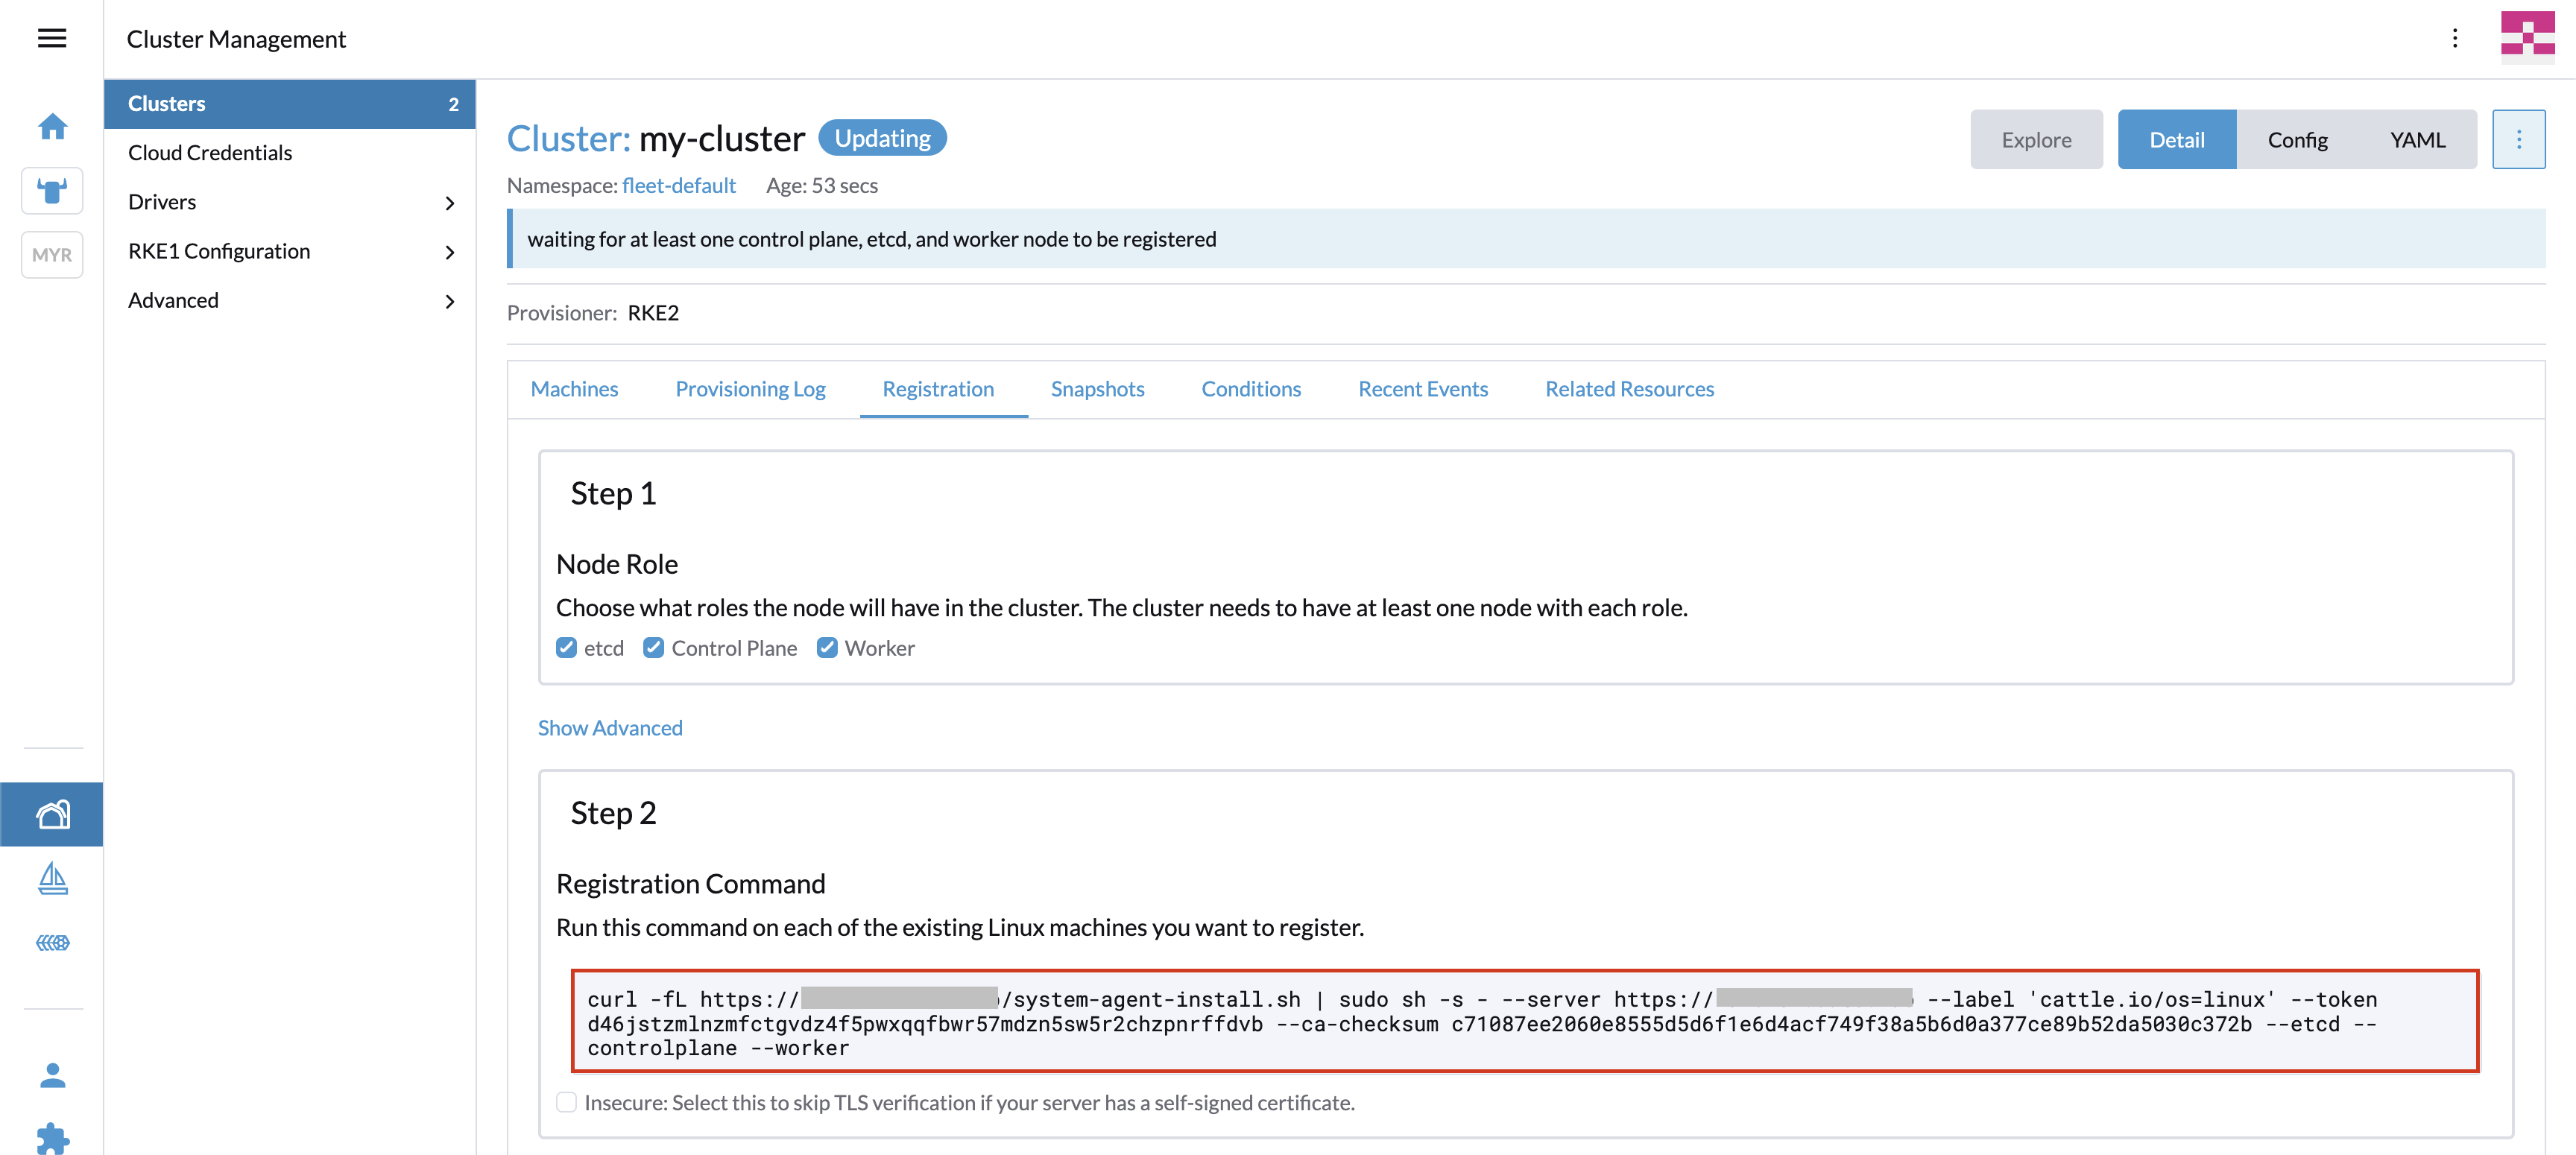
The cluster will stay in Updating state until you add nodes. Click on the cluster.
In the Registration tab you should see the generated Registration command you
need to run on the downstream cluster nodes.
Do not forget to select the correct node roles. Rancher comes with the default to
deploy all three roles (etcd, Control Plane, and Worker), which is often
not what you want for multi-node clusters.
A few seconds after you added at least a single node, you should see the new node(s)
in the Machines tab. Cilium CNI will be installed during the cluster bootstrap process
by Helm Operator, which creates a Kubernetes Job that will install Cilium on the cluster.
After a few minutes, you should see that the node changed to the Ready status:
kubectl get nodes -A
NAME            STATUS   ROLES                              AGE   VERSION
ip-10-1-1-167   Ready    control-plane,etcd,master,worker   41m   v1.32.6+rke2r1
ip-10-1-1-231   Ready    control-plane,etcd,master,worker   41m   v1.32.6+rke2r1
ip-10-1-1-50    Ready    control-plane,etcd,master,worker   45m   v1.32.6+rke2r1
Back in the Rancher UI, you should see that the cluster changed to the healthy
Active status:
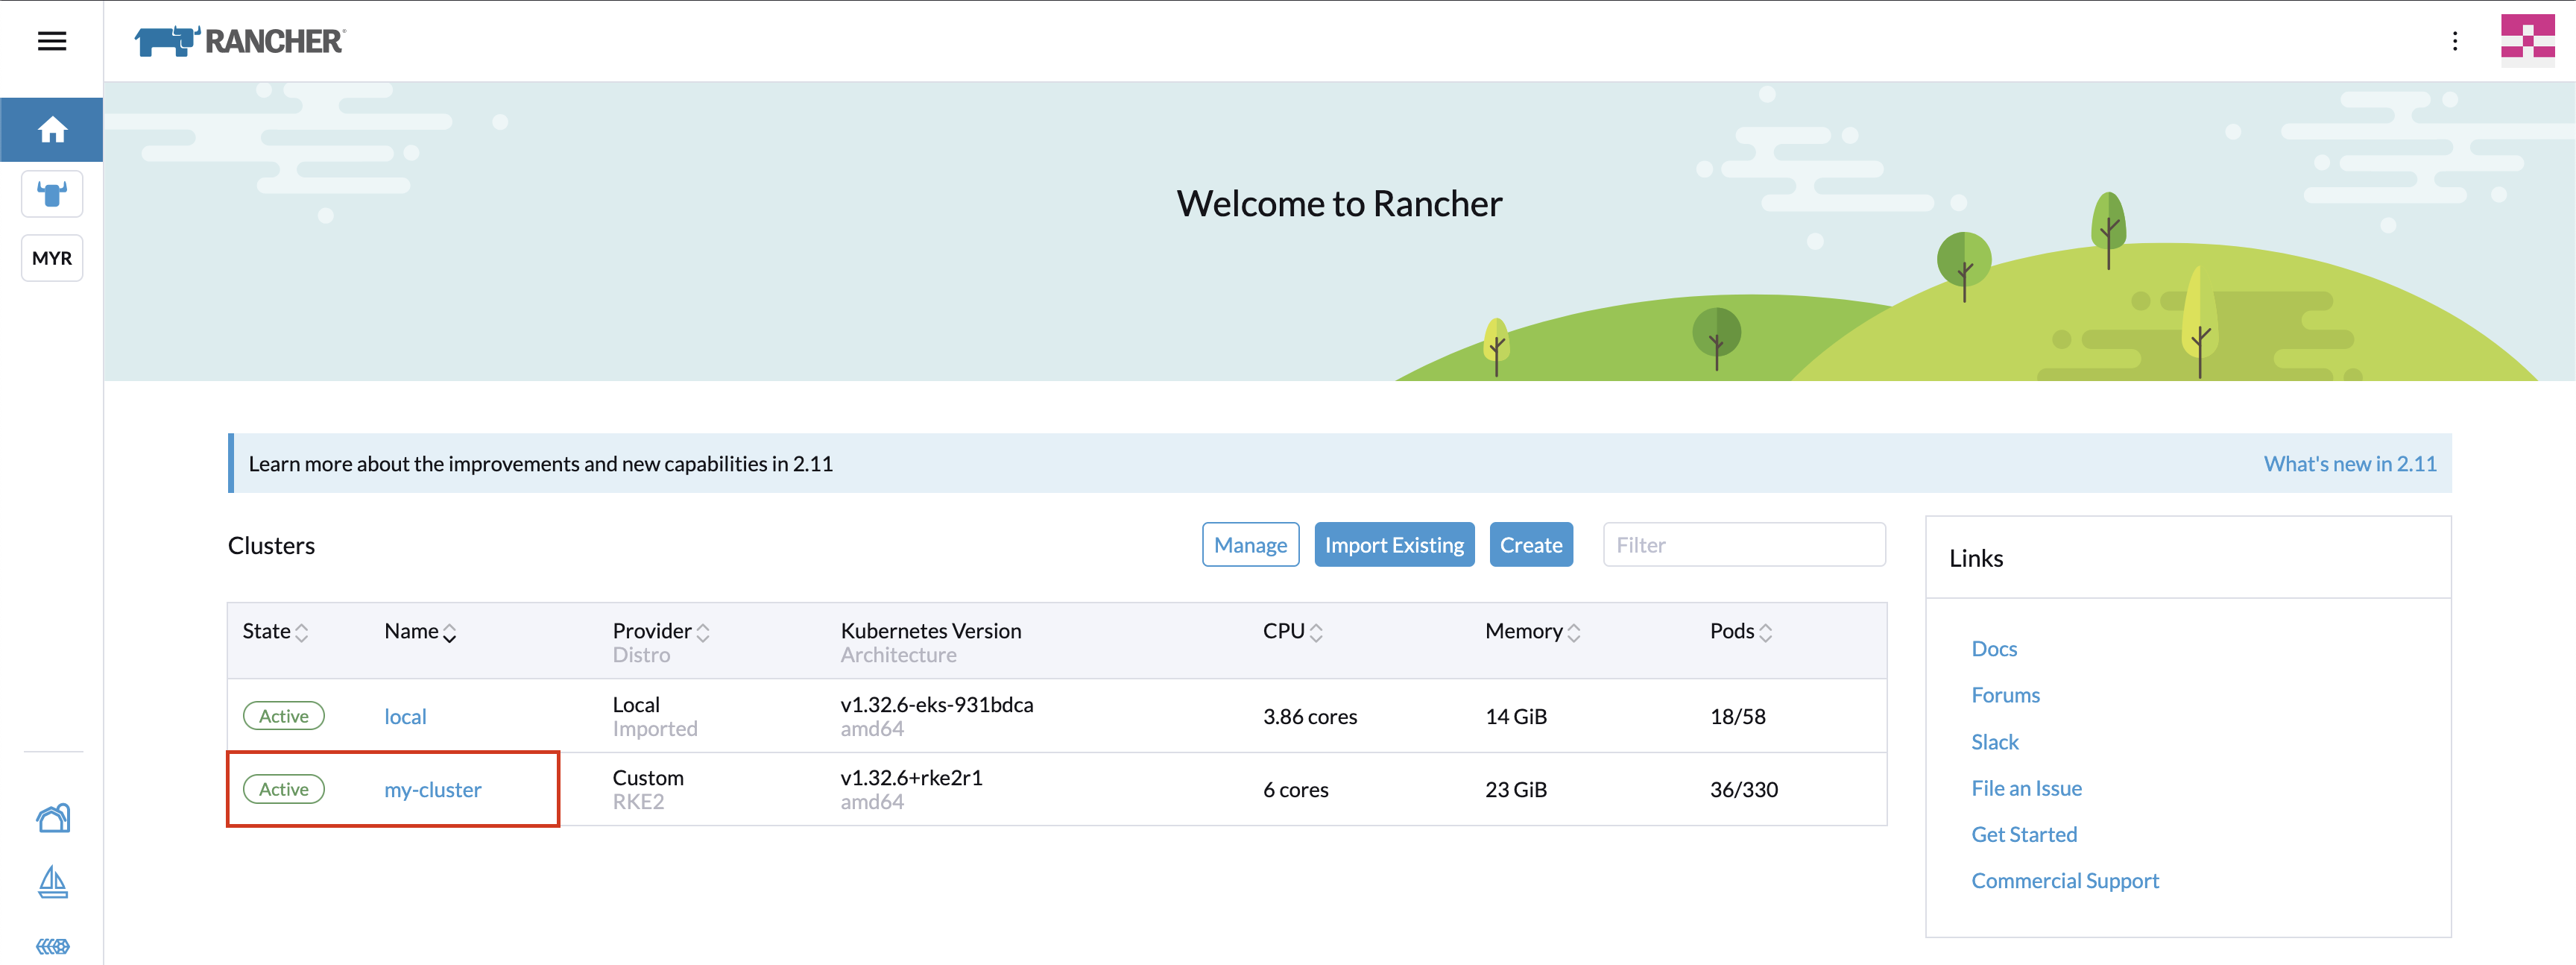
That’s it! You can now work with this cluster as if you had installed the CNI using the default Rancher method. You can scale the cluster up or down, add or remove nodes, and so on.
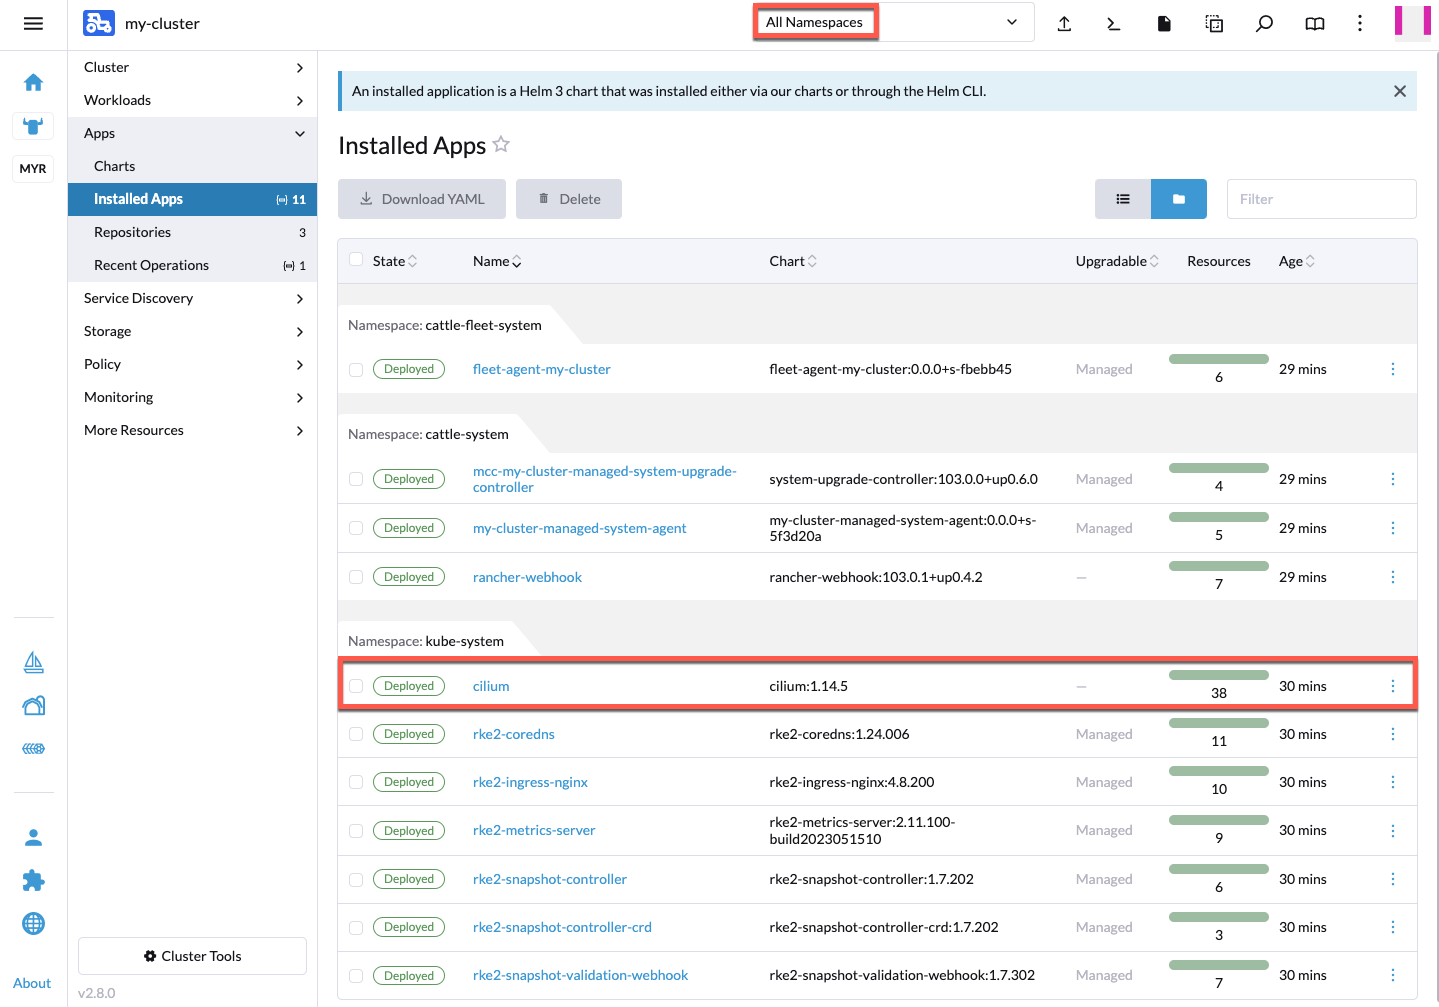
Verify Cilium Installation
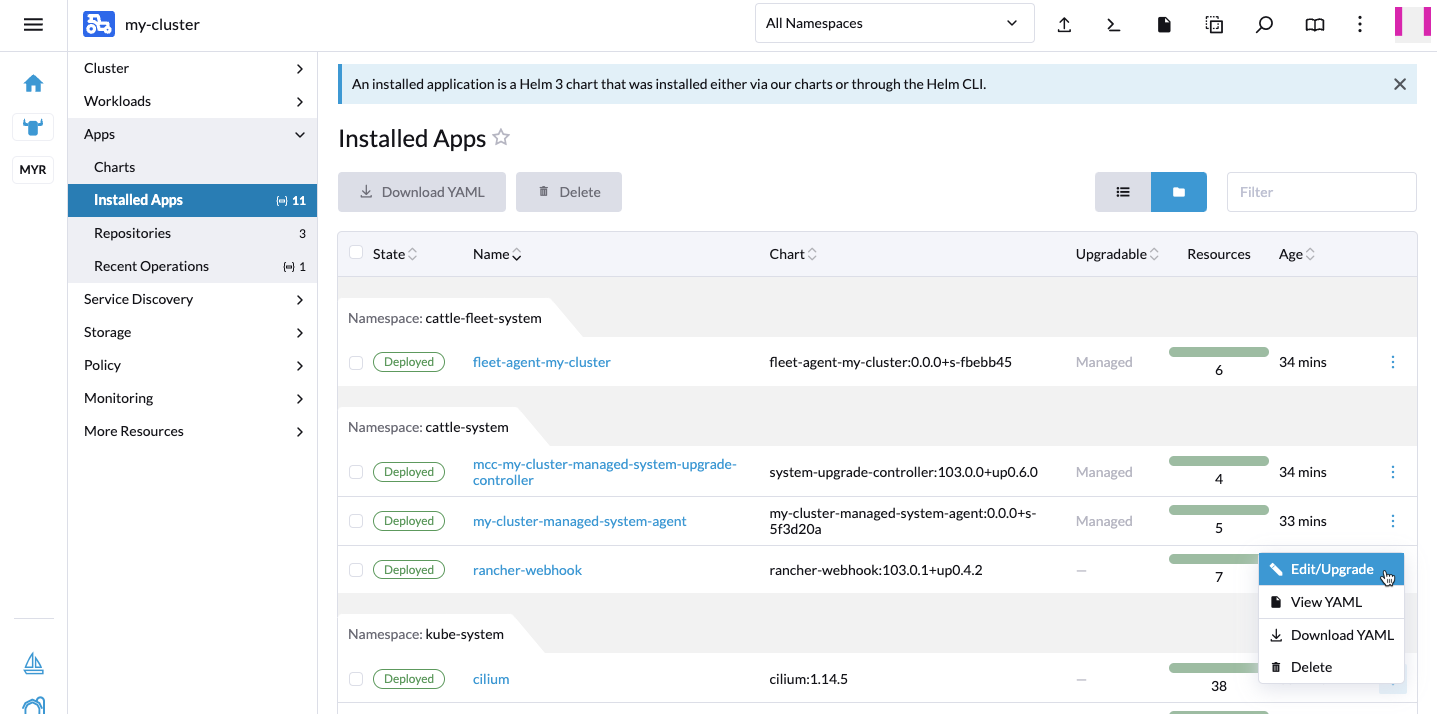
After the installation, the Cilium repository and Helm release will be tracked by Rancher. You can manage the Cilium lifecycle using the Rancher UI. To verify that Cilium is installed, check the Cilium app in the Rancher UI.
Navigate to <your-cluster> -> Apps -> Installed Apps. From the top drop-down menu, select
All Namespaces or Project: System -> kube-system to see the Cilium app.
The Cilium Helm repository has been added to Rancher within the Additional Manifests section.
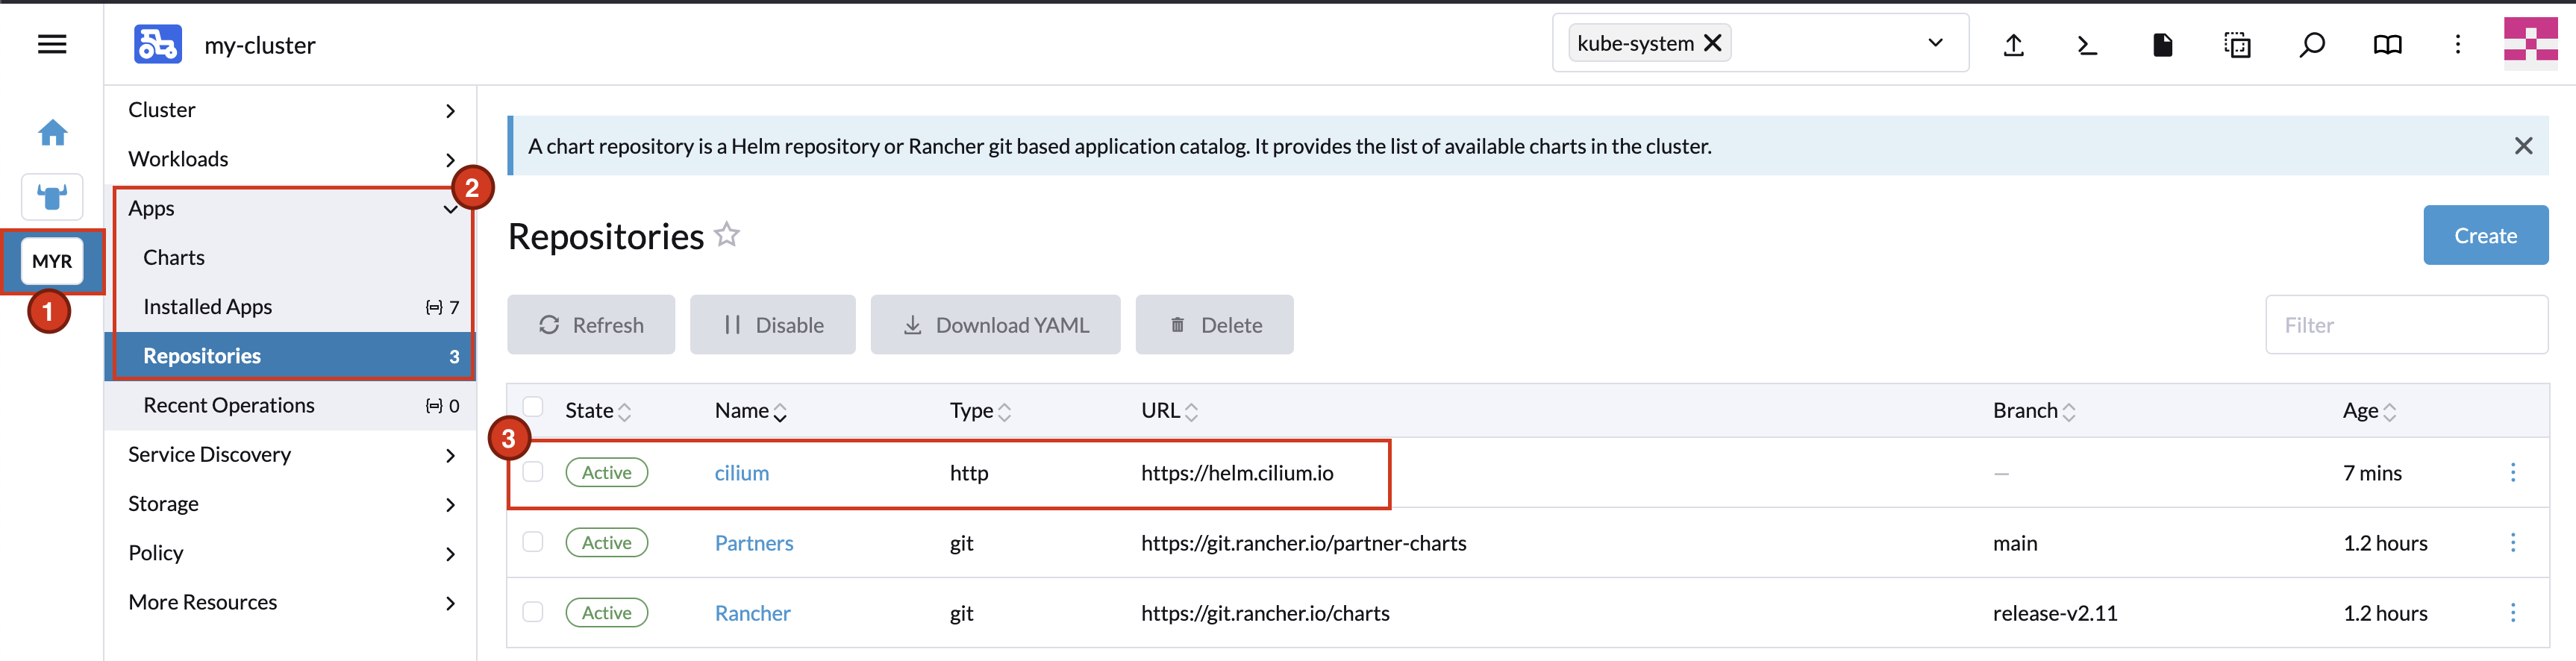
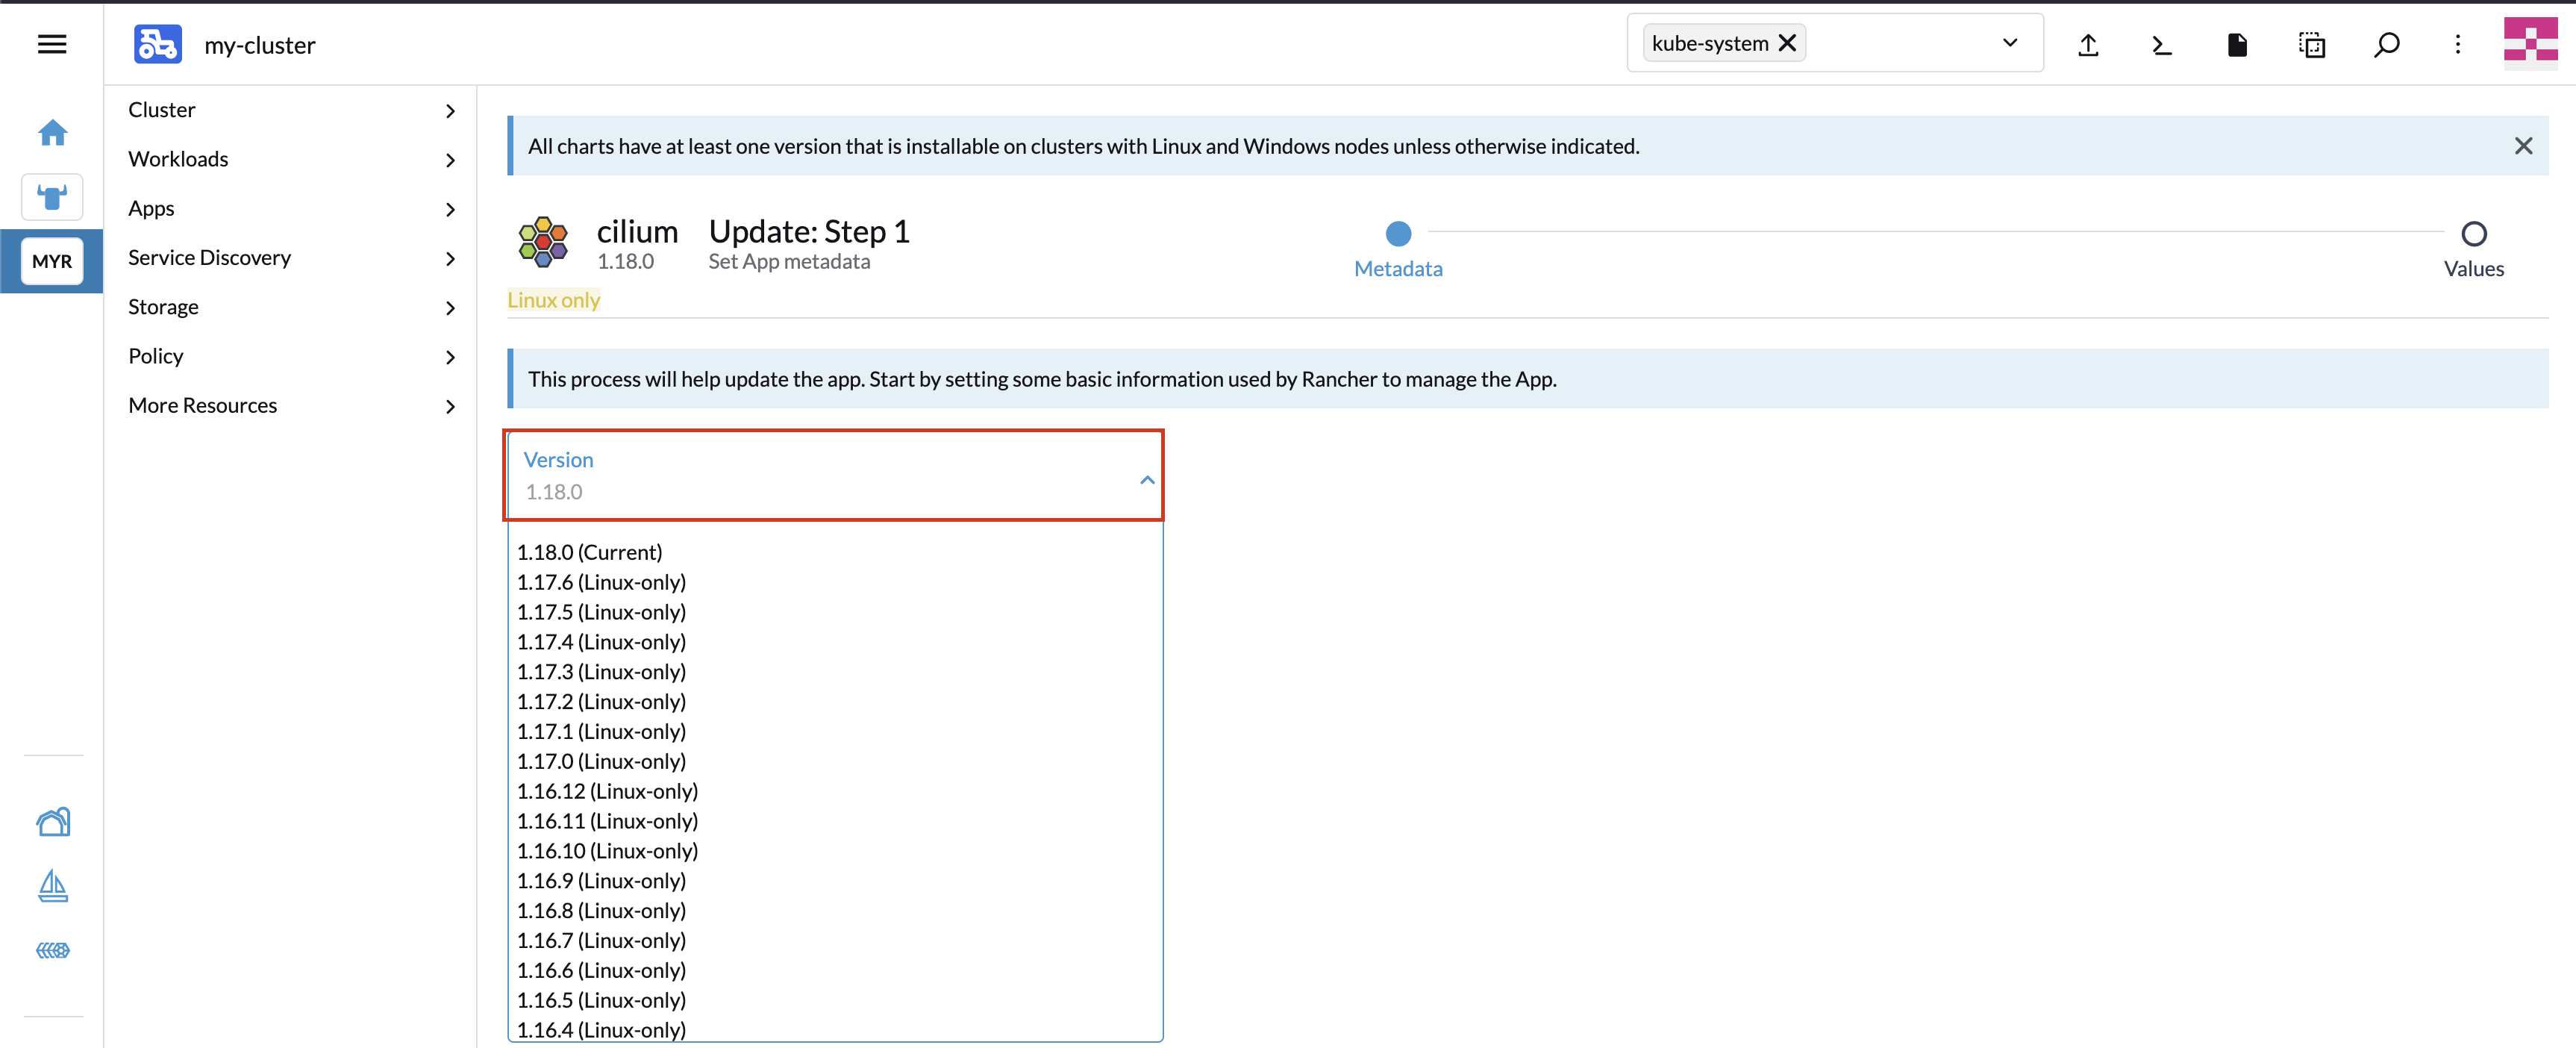
Once the new Cilium version will be available, you will now see a small hint on this app entry when there’s a new Cilium version released. You can then upgrade directly via Rancher UI.