Kata Containers with Cilium
Kata Containers is an open source project that
provides a secure container runtime with lightweight virtual machines that feel
and perform like containers, but provide stronger workload isolation using
hardware virtualization technology as a second layer of defense. Kata
Containers implements OCI runtime spec, just like runc that is used by
Docker. Cilium can be used along with Kata Containers, using both enables
higher degree of security. Kata Containers enhances security in the compute
layer, while Cilium provides policy and observability in the networking layer.
Warning
Due to the different Kata Containers Networking model, there are limitations that can cause connectivity disruptions in Cilium. Please refer to the below Limitations section.
This guide shows how to install Cilium along with Kata Containers. It assumes that you have already followed the official Kata Containers installation user guide to get the Kata Containers runtime up and running on your platform of choice but that you haven’t yet setup Kubernetes.
Note
This guide has been validated by following the Kata Containers guide for Google Compute Engine (GCE) and using Ubuntu 18.04 LTS with the packaged version of Kata Containers, CRI-containerd and Kubernetes 1.18.3.
Setup Kubernetes with CRI
Kata Containers runtime is an OCI compatible runtime and cannot directly interact with the CRI API level. For this reason, it relies on a CRI implementation to translate CRI into OCI. At the time of writing this guide, there are two supported ways called CRI-O and CRI-containerd. It is up to you to choose the one that you want, but you have to pick one.
Refer to the section Requirements for detailed instruction on how to prepare your Kubernetes environment and make sure to use Kubernetes >= 1.12. Then, follow the official guide to run Kata Containers with Kubernetes.
Note
Minimum version of kubernetes 1.12 is required to use the RuntimeClass Feature for Kata Container runtime described below.
With your Kubernetes cluster ready, you can now proceed to deploy Cilium.
Deploy Cilium
Download the Cilium release tarball and change to the kubernetes install directory:
curl -LO https://github.com/cilium/cilium/archive/main.tar.gz
tar xzf main.tar.gz
cd cilium-main/install/kubernetes
Deploy Cilium release via Helm:
helm install cilium ./cilium \
   --namespace kube-system \
   --set bpf.autoMount.enabled=false
helm install cilium ./cilium \ --namespace kube-system
Warning
When using kube-proxy-replacement or its socket-level
loadbalancer with Kata containers, the socket-level loadbalancer should be
disabled for pods by setting socketLB.hostNamespaceOnly=true. See
Socket LoadBalancer Bypass in Pod Namespace for more details.
Validate the Installation
Install the latest version of the Cilium CLI. The Cilium CLI can be used to install Cilium, inspect the state of a Cilium installation, and enable/disable various features (e.g. clustermesh, Hubble).
CILIUM_CLI_VERSION=$(curl -s https://raw.githubusercontent.com/cilium/cilium-cli/main/stable.txt)
CLI_ARCH=amd64
if [ "$(uname -m)" = "aarch64" ]; then CLI_ARCH=arm64; fi
curl -L --fail --remote-name-all https://github.com/cilium/cilium-cli/releases/download/${CILIUM_CLI_VERSION}/cilium-linux-${CLI_ARCH}.tar.gz{,.sha256sum}
sha256sum --check cilium-linux-${CLI_ARCH}.tar.gz.sha256sum
sudo tar xzvfC cilium-linux-${CLI_ARCH}.tar.gz /usr/local/bin
rm cilium-linux-${CLI_ARCH}.tar.gz{,.sha256sum}
CILIUM_CLI_VERSION=$(curl -s https://raw.githubusercontent.com/cilium/cilium-cli/main/stable.txt)
CLI_ARCH=amd64
if [ "$(uname -m)" = "arm64" ]; then CLI_ARCH=arm64; fi
curl -L --fail --remote-name-all https://github.com/cilium/cilium-cli/releases/download/${CILIUM_CLI_VERSION}/cilium-darwin-${CLI_ARCH}.tar.gz{,.sha256sum}
shasum -a 256 -c cilium-darwin-${CLI_ARCH}.tar.gz.sha256sum
sudo tar xzvfC cilium-darwin-${CLI_ARCH}.tar.gz /usr/local/bin
rm cilium-darwin-${CLI_ARCH}.tar.gz{,.sha256sum}
See the full page of releases.
Clone the Cilium GitHub repository so that the Cilium CLI can access the latest unreleased Helm chart from the main branch:
git clone git@github.com:cilium/cilium.git
cd cilium
To validate that Cilium has been properly installed, you can run
$ cilium status --wait
   /¯¯\
/¯¯\__/¯¯\    Cilium:         OK
\__/¯¯\__/    Operator:       OK
/¯¯\__/¯¯\    Hubble:         disabled
\__/¯¯\__/    ClusterMesh:    disabled
   \__/

DaemonSet         cilium             Desired: 2, Ready: 2/2, Available: 2/2
Deployment        cilium-operator    Desired: 2, Ready: 2/2, Available: 2/2
Containers:       cilium-operator    Running: 2
                  cilium             Running: 2
Image versions    cilium             quay.io/cilium/cilium:v1.9.5: 2
                  cilium-operator    quay.io/cilium/operator-generic:v1.9.5: 2
Run the following command to validate that your cluster has proper network connectivity:
$ cilium connectivity test
ℹ️  Monitor aggregation detected, will skip some flow validation steps
✨ [k8s-cluster] Creating namespace for connectivity check...
(...)
---------------------------------------------------------------------------------------------------------------------
📋 Test Report
---------------------------------------------------------------------------------------------------------------------
✅ 69/69 tests successful (0 warnings)
Note
The connectivity test may fail to deploy due to too many open files in one
or more of the pods. If you notice this error, you can increase the
inotify resource limits on your host machine (see
Pod errors due to “too many open files”).
Congratulations! You have a fully functional Kubernetes cluster with Cilium. 🎉
You can monitor as Cilium and all required components are being installed:
$ kubectl -n kube-system get pods --watch
NAME                                    READY   STATUS              RESTARTS   AGE
cilium-operator-cb4578bc5-q52qk         0/1     Pending             0          8s
cilium-s8w5m                            0/1     PodInitializing     0          7s
coredns-86c58d9df4-4g7dd                0/1     ContainerCreating   0          8m57s
coredns-86c58d9df4-4l6b2                0/1     ContainerCreating   0          8m57s
It may take a couple of minutes for all components to come up:
cilium-operator-cb4578bc5-q52qk         1/1     Running   0          4m13s
cilium-s8w5m                            1/1     Running   0          4m12s
coredns-86c58d9df4-4g7dd                1/1     Running   0          13m
coredns-86c58d9df4-4l6b2                1/1     Running   0          13m
You can deploy the “connectivity-check” to test connectivity between pods. It is recommended to create a separate namespace for this.
kubectl create ns cilium-test
Deploy the check with:
kubectl apply -n cilium-test -f https://raw.githubusercontent.com/cilium/cilium/HEAD/examples/kubernetes/connectivity-check/connectivity-check.yaml
It will deploy a series of deployments which will use various connectivity paths to connect to each other. Connectivity paths include with and without service load-balancing and various network policy combinations. The pod name indicates the connectivity variant and the readiness and liveness gate indicates success or failure of the test:
$ kubectl get pods -n cilium-test
NAME                                                     READY   STATUS    RESTARTS   AGE
echo-a-76c5d9bd76-q8d99                                  1/1     Running   0          66s
echo-b-795c4b4f76-9wrrx                                  1/1     Running   0          66s
echo-b-host-6b7fc94b7c-xtsff                             1/1     Running   0          66s
host-to-b-multi-node-clusterip-85476cd779-bpg4b          1/1     Running   0          66s
host-to-b-multi-node-headless-dc6c44cb5-8jdz8            1/1     Running   0          65s
pod-to-a-79546bc469-rl2qq                                1/1     Running   0          66s
pod-to-a-allowed-cnp-58b7f7fb8f-lkq7p                    1/1     Running   0          66s
pod-to-a-denied-cnp-6967cb6f7f-7h9fn                     1/1     Running   0          66s
pod-to-b-intra-node-nodeport-9b487cf89-6ptrt             1/1     Running   0          65s
pod-to-b-multi-node-clusterip-7db5dfdcf7-jkjpw           1/1     Running   0          66s
pod-to-b-multi-node-headless-7d44b85d69-mtscc            1/1     Running   0          66s
pod-to-b-multi-node-nodeport-7ffc76db7c-rrw82            1/1     Running   0          65s
pod-to-external-1111-d56f47579-d79dz                     1/1     Running   0          66s
pod-to-external-fqdn-allow-google-cnp-78986f4bcf-btjn7   1/1     Running   0          66s
Note
If you deploy the connectivity check to a single node cluster, pods that check multi-node
functionalities will remain in the Pending state. This is expected since these pods
need at least 2 nodes to be scheduled successfully.
Once done with the test, remove the cilium-test namespace:
kubectl delete ns cilium-test
Run Kata Containers with Cilium CNI
Now that your Kubernetes cluster is configured with the Kata Containers runtime and Cilium as the CNI, you can run a sample workload by following these instructions.
Limitations
Due to its different Networking Design Architecture, the Kata runtime adds an additional layer of abstraction inside the Container Networking Namespace created by Cilium (referred to as “outer”). In that namespace, Kata creates an isolated VM with an additional Container Networking Namespace (referred to as “inside”) to host the requested Pod, as depicted below.
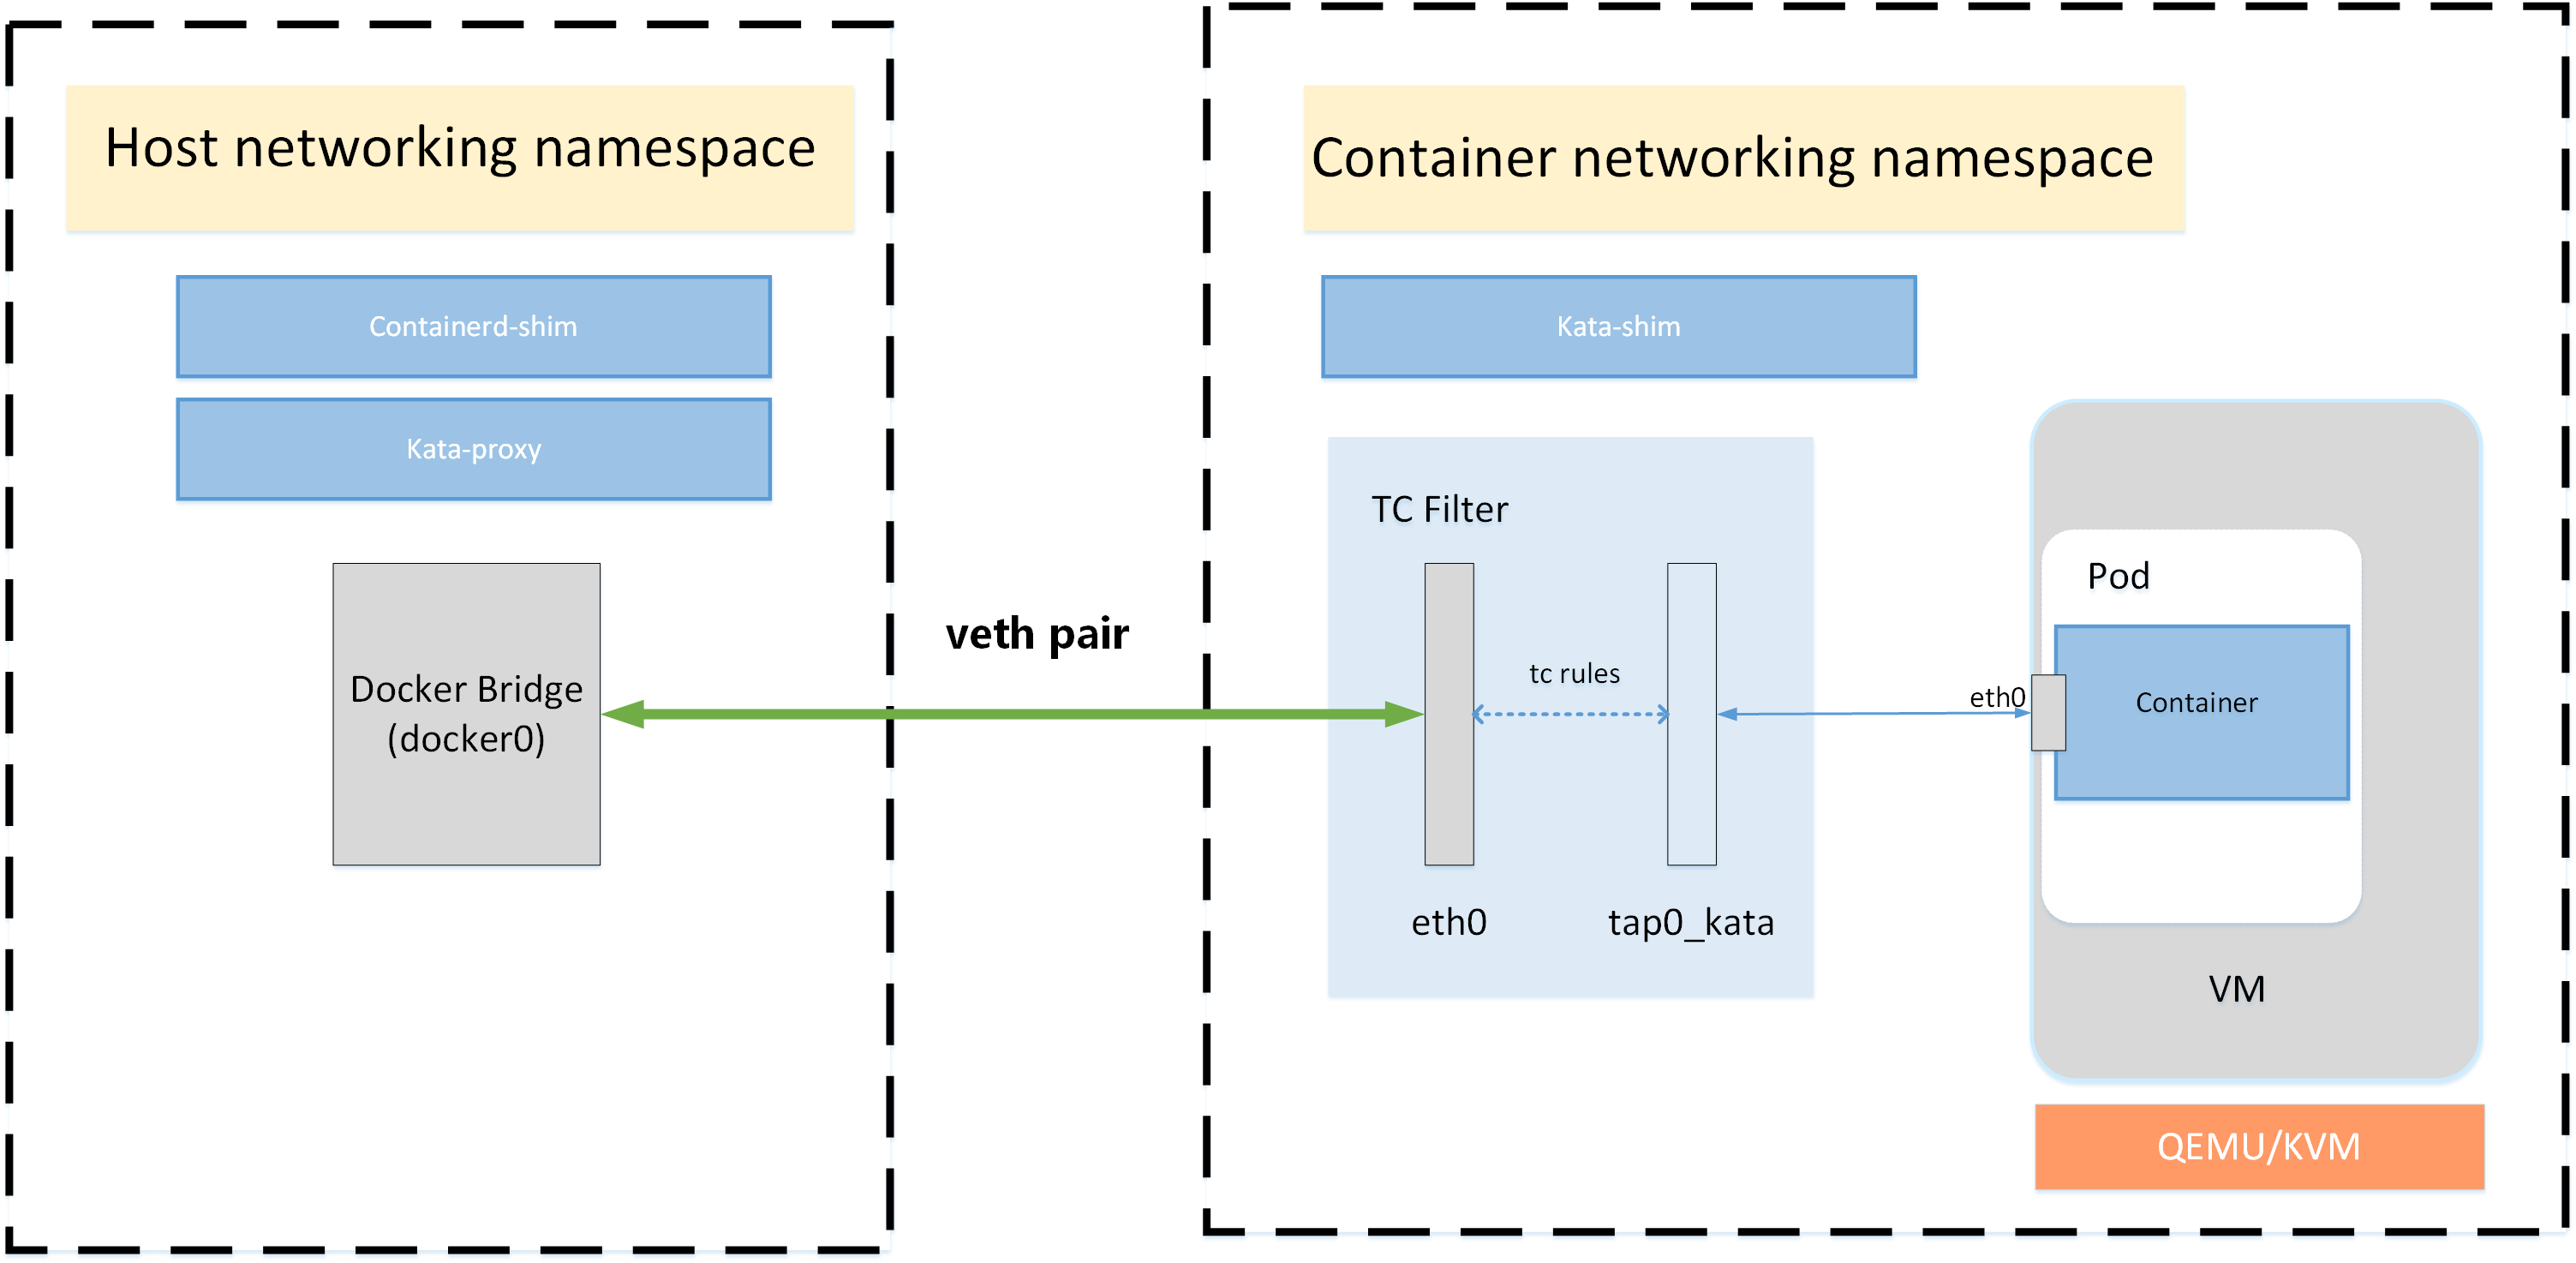
Upon the outer Container Networking Namespace creation, the Cilium CNI performs the following two actions:
creates the
eth0interface with the samedevice MTUof either the detected underlying network, or the MTU specified in the Cilium ConfigMap;adjusts the
default route MTU(computed asdevice MTU - overhead) to account for the additional networking overhead given by the Cilium configuration (ex. +50B for VXLAN, +80B for WireGuard, etc.).
However, during the inner Container Networking Namespace creation (i.e., the pod
inside the VM), only the outer eth0 device MTU (1) is copied over by Kata to
the inner eth0, while the default route MTU (2) is ignored. For this reason,
depending on the types of connections, users might experience performance degradation
or even packet drops between traditional pods and KataPod connections due to
multiple (unexpected) fragmentation.
There are currently two possible workarounds, with (b) being preferred:
set a lower MTU value in the Cilium ConfigMap to account for the overhead. This would allow the KataPod to have a lower device MTU and prevent unwanted fragmentation. However, this is not recommended as it would have a relevant impact on all the other types of communications (ex. traditional pod-to-pod, pod-to-node, etc.) due to the lower device MTU value being set on all the Cilium-managed interfaces.
modify the KataPod deployment by adding an
initContainer(with NET_ADMIN) to adjust the route MTU inside the inner pod. This would not only align the KataPod configuration to all the other pods, but also it would not harm all the other types of connections, given that it is a self-contained solution in the KataPod itself. The correctroute MTUvalue to set can be either manually computed or retrieved by issuingip routeon a Cilium Pod (or inside a traditional pod). Here follows an example of a KataPod deployment (runtimeClassName: kata-clh) on a cluster with only Cilium VXLAN enabled (route MTU = 1500B - 50B = 1450):apiVersion: v1 kind: Pod metadata: name: nginx-pod labels: app: nginx spec: runtimeClassName: kata-clh containers: - name: nginx image: nginx:latest ports: - containerPort: 80 initContainers: - name: set-mtu image: busybox:latest command: - sh - -c - | DEFAULT="$(ip route show default)" ip route replace "$DEFAULT" mtu 1450 securityContext: capabilities: add: - NET_ADMIN