Inspecting TLS Encrypted Connections with Cilium
This document serves as an introduction for how network security teams can use Cilium to transparently inspect TLS-encrypted connections. This TLS-aware inspection allows Cilium API-aware visibility and policy to function even for connections where client to server communication is protected by TLS, such as when a client accesses the API service via HTTPS. This capability is similar to what is possible to traditional hardware firewalls, but is implemented entirely in software on the Kubernetes worker node, and is policy driven, allowing inspection to target only selected network connectivity.
This type of visibility is extremely valuable to be able to monitor how external API services are being used, for example, understanding which S3 buckets are being accessed by an given application.
If you haven’t read the Introduction to Cilium & Hubble yet, we’d encourage you to do that first.
The best way to get help if you get stuck is to ask a question on Cilium Slack. With Cilium contributors across the globe, there is almost always someone available to help.
Setup Cilium
If you have not set up Cilium yet, follow the guide Cilium Quick Installation for instructions on how to quickly bootstrap a Kubernetes cluster and install Cilium. If in doubt, pick the minikube route, you will be good to go in less than 5 minutes.
A Brief Overview of the TLS Certificate Model
TLS is a protocol that “wraps” other protocols like HTTP and ensures that communication between client and server has confidentiality (no one can read the data except the intended recipient), integrity (recipient can confirm that the data has not been modified in transit), and authentication (sender can confirm that it is talking with the intended destination, not an impostor). We will provide a highly simplified overview of TLS in this document, but for full details, please see https://en.wikipedia.org/wiki/Transport_Layer_Security .
From an authentication perspective, the TLS model relies on a “Certificate Authority” (CA) which is an entity that is trusted to create proof that a given network service (e.g., www.cilium.io) is who they say they are. The goal is to prevents a malicious party in the network between the client and the server from intercepting the traffic and pretending to be the destination server.
In the case of “friendly interception” for network security monitoring, Cilium uses a model similar to traditional firewalls with TLS inspection capabilities: the network security team creates their own “internal certificate authority” that can be used to create alternative certificates for external destinations. This model requires each client workload to also trust this new certificate, otherwise the client’s TLS library will reject the connection as invalid. In this model, the network firewall uses the certificate signed by the internal CA to act like the destination service and terminate the TLS connection. This allows the firewall to inspect and even modify the application layer data, and then initiate another TLS connect to the actual destination service.
The CA model within TLS is based on cryptographic keys and certificates. Realizing the above model requires four primary steps:
Create an internal certificate authority by generating a CA private key and CA certificate.
For any destination where TLS inspection is desired (e.g., httpbin.org in the example below), generate a private key and certificate signing request with a common name that matches the destination DNS name.
Use the CA private key to create a signed certificate.
Ensure that all clients where TLS inspection is have the CA certificate installed so that they will trust all certificates signed by that CA.
Given that Cilium will be terminating the initial TLS connection from the client and creating a new TLS connection to the destination, Cilium must be told the set of CAs that it should trust when validating the new TLS connection to the destination service.
Note
In a non-demo environment it is EXTREMELY important that you keep the above private keys safe, as anyone with access to this private key will be able to inspect TLS-encrypted traffic (certificates on the other hand are public information, and are not at all sensitive). In the guide below, the CA private key does not need to be provided to Cilium at all (it is used only to create certificates, which can be done offline) and private keys for individual destination services are stored as Kubernetes secrets. These secrets should be stored in a namespace where they can be accessed by Cilium, but not general purpose workloads.
How TLS Inspection works
All TLS inspection relies on terminating the originating connection with a certificate that will be accepted, then originating a new TLS connection using a client certificate if necessary.
Because of this, the Network Policy requires configuring a terminatingTLS and optionally
an originatingTLS stanza.
When the Network Policy contains these details, then Cilium will redirect TLS connections to Envoy, and allow connections that complete a TLS handshake and pass the configured Network Policy.
One of the most important parts of the configuration for this is how the certificates get to Envoy.
In the current version, Cilium has two options, NPDS (the original) and SDS (the new and better version).
Network Policy Discovery Service (NPDS)
In this version, certificates and keys are sent inline as Base64 encoded text in dedicated fields in the Cilium-owned Network Policy Discovery Service.
This had the advantage that it was straightforward to build, but does come with a big disadvantage:
Each Network Policy rule that does TLS Interception keeps its own copy of each secret inline in the
NPDS config in Envoy. So, if (as is likely for a larger installation), you have the same secret reused
multiple times (for example if you generate one certificate that will terminate for many SANs, but you
have multiple rules using that certificate, or you include a valid root certificate bundle in the
originatingTLS config), then multiple copies of the certificate will be stored in Envoy’s memory.
This memory use can really add up in a large installation.
It also means that we don’t benefit from work that has been done to protect secrets when they are sent using Secret Discovery Service (.
Secret Discovery Service (SDS)
Both of the above reasons are why Envoy supports SDS for Network Policy secrets as of Cilium 1.17.
In this configuration, Cilium reads relevant Secrets from a configured secrets namespace, and exposes those secrets to Envoy using the core Envoy SDS API. Those secrets are then referenced in the NPDS config that’s sent to Envoy to configure the Network Policy filter there by name, rather than being included directly as Base64 encoded text.
This means that Envoy looks up the SDS secrets for NPDS in the same way as it does the secrets for Ingress or Gateway API config.
This method also allows Envoy to deduplicate the storage of the secrets, since they are essentially being passed by reference instead of being passed by value.
Because of these advantages over the older NPDS method, SDS is the default for new Cilium installations as at Cilium 1.17.
Configuring TLS Interception
There are three ways to use Cilium in 1.17 and later:
Using SDS, Secrets referenced in Network Policy can be located anywhere in the cluster, and are copied into a configured namespace (
cilium-secretsby default) by the Cilium Operator, synchronized from there into SDS, then referenced in NPDS using that name. This is the default for new clusters, and the recommended method of operation.Secrets can be located anywhere in the cluster, and the Cilium Agent can be granted read access to all Secrets in the cluster. In this case, Secrets are read directly from their original location by the Cilium Agent and sent inline in NPDS. This deployment method is included for backwards compatibility purposes and is not recommended, as it significantly expands the security scope of the agent.
Secrets can be added directly to the
cilium-secretsnamespace, then referenced in that namespace from Network Policy. This is also included for backwards compatibility based on user feedback about how this feature was actually being used. It is the default for upgraded clusters that have not configured any settings and are using theupgradeCompatibilitysetting in Helm, set to1.16or below.
There are three settings in Helm that affect TLS Interception:
tls.secretsNamespace.name- defaultcilium-secrets. Configures the secrets namespace that will be used for Policy secrets. Note that this is set to the same value as a similar setting for Ingress, Gateway API, and BGP configuration by default, but may be set to a different value.tls.readSecretsOnlyFromSecretsNamespace- defaulttrue. This setting tells the Helm chart and Cilium whether the Cilium Agent should only read secrets from the configured Secrets namespace, or if the Cilium Agent should attempt to read Secrets directly from their location in the cluster. Previous versions of Cilium used the itemtls.secretsBackend, which could be set tolocal(meaning only read from the Secrets namespace) ork8s(meaning read from any namespace), but that field is now deprecated, as its naming had become detached from its function. Previous installations that settls.secretsBackendtok8sshould migrate to settingtls.readSecretsOnlyFromSecretsNamespacetofalseinstead, although the setting will continue to work for Cilium 1.17.tls.secretsBackendwill be removed in a future Cilium version.tls.secretSync.enabled- defaulttruefor new clusters. Configures secret synchronization and SDS use for Network Policy secrets. SDS use requires this to be set totrue, and must be disabled when this field is set tofalse, so having an additional field for SDS config added no value.
Configuring the three available modes for TLS Interception
SDS Mode (recommended, default for new clusters):
Set the following settings in your Helm Values:
tls:
  readSecretsOnlyFromSecretsNamespace: true
  secretsNamespace:
    name: cilium-secrets # This setting is optional, as it is the default
  secretSync:
    enabled: true
Read all Secrets in the Cluster mode (not recommended)
Set the following settings in your Helm Values:
tls:
  readSecretsOnlyFromSecretsNamespace: false
  secretSync:
    enabled: false
Read Secrets only from secrets namespace, no SDS (default for upgraded clusters)
Set the following settings in your Helm Values:
tls:
  readSecretsOnlyFromSecretsNamespace: true
  secretsNamespace:
    name: cilium-secrets # This setting is optional, as it is the default
  secretSync:
    enabled: false
Note
If you are using this mode, then you will need to replace all references to
kube-system in the validation instructions on this page with cilium-secrets
(or whatever value you have set that namespace to).
Once you’ve chosen an option and configured your Cilium installation accordingly, proceed with verifying your install using the rest of these instructions.
Deploy the Demo Application
To demonstrate TLS-interception we will use the same mediabot application that we used for the DNS-aware policy example.
This application will access the Star Wars API service using HTTPS, which would normally mean that network-layer mechanisms
like Cilium would not be able to see the HTTP-layer details of the communication, since all application data is encrypted
using TLS before that data is sent on the network.
In this guide we will learn about:
Creating an internal Certificate Authority (CA) and associated certificates signed by that CA to enable TLS interception.
Using Cilium network policy to select the traffic to intercept using DNS-based policy rules.
Inspecting the details of the HTTP request using cilium monitor (accessing this visibility data via Hubble, and applying Cilium network policies to filter/modify the HTTP request is also possible, but is beyond the scope of this simple Getting Started Guide)
First off, we will create a single pod mediabot application:
$ kubectl create -f https://raw.githubusercontent.com/cilium/cilium/HEAD/examples/kubernetes-dns/dns-sw-app.yaml
$ kubectl wait pod/mediabot --for=condition=Ready
$ kubectl get pods
NAME                             READY   STATUS    RESTARTS   AGE
pod/mediabot                     1/1     Running   0          14s
Generating and Installing TLS Keys and Certificates
Now that we understand TLS and have configured Cilium to use TLS interception, we will walk through the
concrete steps to generate the appropriate keys and certificates using the openssl utility.
The following image describes the different files containing cryptographic data that are generated or copied, and what components in the system need access to those files:
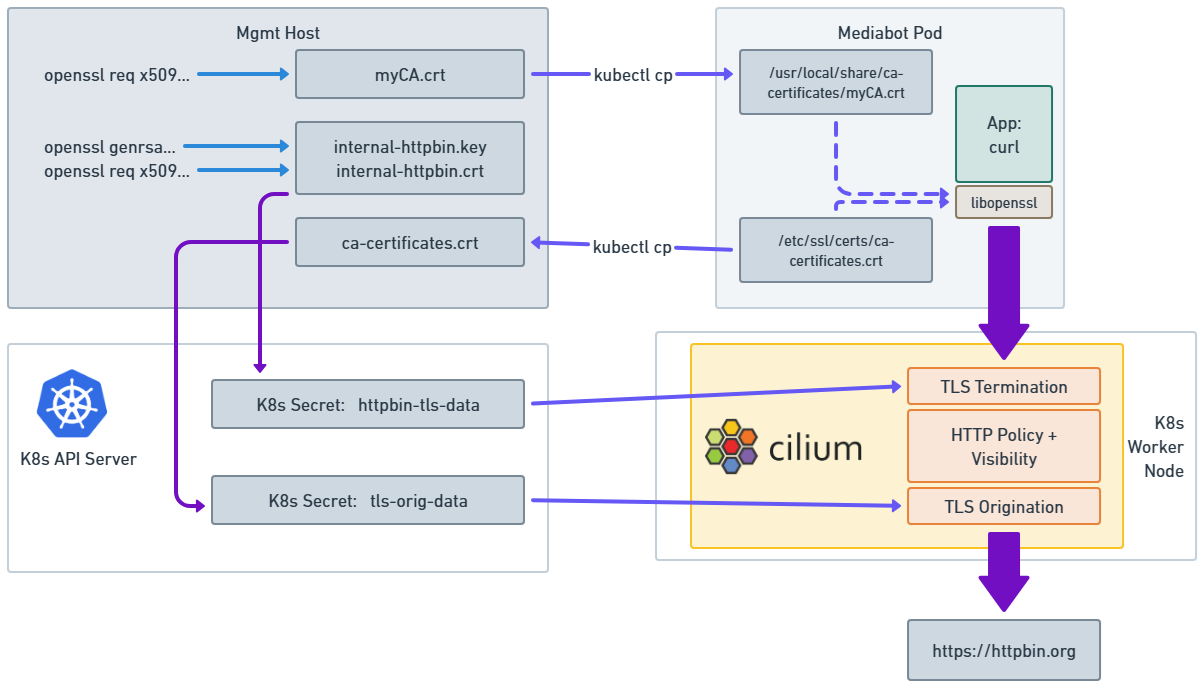
You can use openssl on your local system if it is already installed, but if not a simple
shortcut is to use kubectl exec to execute /bin/bash within any of the cilium pods, and
then run the resulting openssl commands. Use kubectl cp to copy the resulting files out
of the cilium pod when it is time to use them to create Kubernetes secrets of copy them to the
mediabot pod.
Create Private Key and Certificate Signing Request for a Given DNS Name
Generate an internal private key and certificate signing with a common name that matches the DNS name
of the destination service to be intercepted for inspection (in this example, use httpbin.org).
First create the private key:
$ openssl genrsa -out internal-httpbin.key 2048
Next, create a certificate signing request, specifying the DNS name of the destination service for the common name field when prompted. All other prompts can be filled with any value.
$ openssl req -new -key internal-httpbin.key -out internal-httpbin.csr
The only field that must be a specific value is ensuring that Common Name is the exact DNS
destination httpbin.org that will be provided to the client.
This example workflow will work for any DNS name as long as the toFQDNs rule in the policy YAML (below) is also updated to match the DNS name in the certificate.
Use CA to Generate a Signed Certificate for the DNS Name
Use the internal CA private key to create a signed certificate for httpbin.org named internal-httpbin.crt.
$ openssl x509 -req -days 360 -in internal-httpbin.csr -CA myCA.crt -CAkey myCA.key -CAcreateserial -out internal-httpbin.crt -sha256
Next we create a Kubernetes secret that includes both the private key and signed certificates for the destination service:
$ kubectl create secret tls httpbin-tls-data -n kube-system --cert=internal-httpbin.crt --key=internal-httpbin.key
Add the Internal CA as a Trusted CA Inside the Client Pod
Once the CA certificate is inside the client pod, we still must make sure that the CA file is picked up by the TLS library used by your application. Most Linux applications automatically use a set of trusted CA certificates that are bundled along with the Linux distro. In this guide, we are using an Ubuntu container as the client, and so will update it with Ubuntu specific instructions. Other Linux distros will have different mechanisms. Also, individual applications may leverage their own certificate stores rather than use the OS certificate store. Java applications and the aws-cli are two common examples. Please refer to the application or application runtime documentation for more details.
For Ubuntu, we first copy the additional CA certificate to the client pod filesystem
$ kubectl cp myCA.crt default/mediabot:/usr/local/share/ca-certificates/myCA.crt
Then run the Ubuntu-specific utility that adds this certificate to the global set of trusted certificate authorities in /etc/ssl/certs/ca-certificates.crt .
$ kubectl exec mediabot -- update-ca-certificates
This command will issue a WARNING, but this can be ignored.
Provide Cilium with List of Trusted CAs
Next, we will provide Cilium with the set of CAs that it should trust when originating the secondary TLS connections. This list should correspond to the standard set of global CAs that your organization trusts. A logical option for this is the standard CAs that are trusted by your operating system, since this is the set of CAs that were being used prior to introducing TLS inspection.
To keep things simple, in this example we will simply copy this list out of the Ubuntu filesystem of the mediabot pod, though it is important to understand that this list of trusted CAs is not specific to a particular TLS client or server, and so this step need only be performed once regardless of how many TLS clients or servers are involved in TLS inspection.
$ kubectl cp default/mediabot:/etc/ssl/certs/ca-certificates.crt ca-certificates.crt
We then will create a Kubernetes secret using this certificate bundle so that Cilium can read the certificate bundle and use it to validate outgoing TLS connections.
$ kubectl create secret generic tls-orig-data -n kube-system --from-file=ca.crt=./ca-certificates.crt
Apply DNS and TLS-aware Egress Policy
Up to this point, we have created keys and certificates to enable TLS inspection, but we have not told Cilium which traffic we want to intercept and inspect. This is done using the same Cilium Network Policy constructs that are used for other Cilium Network Policies.
The following Cilium network policy indicates that Cilium should perform HTTP-aware inspect
of communication between the mediabot pod to httpbin.org.
apiVersion: "cilium.io/v2"
kind: CiliumNetworkPolicy
metadata:
  name: "l7-visibility-tls"
spec:
  description: L7 policy with TLS
  endpointSelector:
    matchLabels:
      org: empire
      class: mediabot
  egress:
  - toFQDNs:
    - matchName: "httpbin.org"
    toPorts:
    - ports:
      - port: "443"
        protocol: "TCP"
      terminatingTLS:
        secret:
          namespace: "kube-system"
          name: "httpbin-tls-data"
      originatingTLS:
        secret:
          namespace: "kube-system"
          name: "tls-orig-data"
      rules:
        http:
        - {}
  - toPorts:
    - ports:
      - port: "53"
        protocol: ANY
      rules:
        dns:
          - matchPattern: "*"
Let’s take a closer look at the policy:
The
endpointSelectormeans that this policy will only apply to pods with labelsclass: mediabot, org:empireto have the egress access.The first egress section uses
toFQDNs: matchNamespecification to allow TCP port 443 egress tohttpbin.org.The
httpsection below the toFQDNs rule indicates that such connections should be parsed as HTTP, with a policy of{}which will allow all requests.The
terminatingTLSandoriginatingTLSsections indicate that TLS interception should be used to terminate the initial TLS connection from mediabot and initiate a new out-bound TLS connection tohttpbin.org.The second egress section allows
mediabotpods to accesskube-dnsservice. Note thatrules: dnsinstructs Cilium to inspect and allow DNS lookups matching specified patterns. In this case, inspect and allow all DNS queries.
Note that with this policy the mediabot doesn’t have access to any internal cluster service other than kube-dns
and will have no access to any other external destinations either. Refer to Overview of Network Policy
to learn more about policies for controlling access to internal cluster services.
Let’s apply the policy:
$ kubectl create -f https://raw.githubusercontent.com/cilium/cilium/HEAD/examples/kubernetes-tls-inspection/l7-visibility-tls.yaml
Demonstrating TLS Inspection
Recall that the policy we pushed will allow all HTTPS requests from mediabot to httpbin.org, but will parse all data at
the HTTP-layer, meaning that cilium monitor will report each HTTP request and response.
To see this, open a new window and run the following command to identity the name of the
cilium pod (e.g, cilium-97s78) that is running on the same Kubernetes worker node as the mediabot pod.
Then start running cilium-dbg monitor in “L7 mode” to monitor for HTTP requests being reported by Cilium:
$ kubectl exec -it -n kube-system cilium-d5x8v -- cilium-dbg monitor -t l7
Next in the original window, from the mediabot pod we can access httpbin.org via HTTPS:
$ kubectl exec -it mediabot -- curl -sL 'https://httpbin.org/anything'
...
...

$ kubectl exec -it mediabot -- curl -sL 'https://httpbin.org/headers'
...
...
Looking back at the cilium-dbg monitor window, you will see each individual HTTP request and response. For example:
-> Request http from 2585 ([k8s:class=mediabot k8s:org=empire k8s:io.kubernetes.pod.namespace=default k8s:io.cilium.k8s.policy.serviceaccount=default k8s:io.cilium.k8s.policy.cluster=default]) to 0 ([reserved:world]), identity 24948->2, verdict Forwarded GET https://httpbin.org/anything => 0
-> Response http to 2585 ([k8s:io.kubernetes.pod.namespace=default k8s:io.cilium.k8s.policy.serviceaccount=default k8s:io.cilium.k8s.policy.cluster=default k8s:class=mediabot k8s:org=empire]) from 0 ([reserved:world]), identity 24948->2, verdict Forwarded GET https://httpbin.org/anything => 200
Refer to Layer 4 Policies and Layer 7 Policies to learn more about Cilium L4 and L7 network policies.
Clean-up
$ kubectl delete -f https://raw.githubusercontent.com/cilium/cilium/HEAD/examples/kubernetes-dns/dns-sw-app.yaml
$ kubectl delete cnp l7-visibility-tls
$ kubectl delete secret -n kube-system tls-orig-data
$ kubectl delete secret -n kube-system httpbin-tls-data