Troubleshooting
This document describes how to troubleshoot Cilium in different deployment modes. It focuses on a full deployment of Cilium within a datacenter or public cloud. If you are just looking for a simple way to experiment, we highly recommend trying out the Getting Started guide instead.
This guide assumes that you have read the Networking Concepts and Securing Networks with Cilium which explain all the components and concepts.
We use GitHub issues to maintain a list of Cilium Frequently Asked Questions (FAQ). You can also check there to see if your question(s) is already addressed.
Component & Cluster Health
Kubernetes
An initial overview of Cilium can be retrieved by listing all pods to verify
whether all pods have the status Running:
$ kubectl -n kube-system get pods -l k8s-app=cilium
NAME           READY     STATUS    RESTARTS   AGE
cilium-2hq5z   1/1       Running   0          4d
cilium-6kbtz   1/1       Running   0          4d
cilium-klj4b   1/1       Running   0          4d
cilium-zmjj9   1/1       Running   0          4d
If Cilium encounters a problem that it cannot recover from, it will
automatically report the failure state via cilium-dbg status which is regularly
queried by the Kubernetes liveness probe to automatically restart Cilium pods.
If a Cilium pod is in state CrashLoopBackoff then this indicates a
permanent failure scenario.
Detailed Status
If a particular Cilium pod is not in running state, the status and health of
the agent on that node can be retrieved by running cilium-dbg status in the
context of that pod:
$ kubectl -n kube-system exec cilium-2hq5z -- cilium-dbg status
KVStore:                Ok   etcd: 1/1 connected: http://demo-etcd-lab--a.etcd.tgraf.test1.lab.corp.isovalent.link:2379 - 3.2.5 (Leader)
ContainerRuntime:       Ok   docker daemon: OK
Kubernetes:             Ok   OK
Kubernetes APIs:        ["cilium/v2::CiliumNetworkPolicy", "networking.k8s.io/v1::NetworkPolicy", "core/v1::Service", "core/v1::Endpoint", "core/v1::Node", "CustomResourceDefinition"]
Cilium:                 Ok   OK
NodeMonitor:            Disabled
Cilium health daemon:   Ok
Controller Status:      14/14 healthy
Proxy Status:           OK, ip 10.2.0.172, port-range 10000-20000
Cluster health:   4/4 reachable   (2018-06-16T09:49:58Z)
Alternatively, the k8s-cilium-exec.sh script can be used to run cilium-dbg
status on all nodes. This will provide detailed status and health information
of all nodes in the cluster:
curl -sLO https://raw.githubusercontent.com/cilium/cilium/main/contrib/k8s/k8s-cilium-exec.sh
chmod +x ./k8s-cilium-exec.sh
… and run cilium-dbg status on all nodes:
$ ./k8s-cilium-exec.sh cilium-dbg status
KVStore: Ok Etcd: http://127.0.0.1:2379 - (Leader) 3.1.10
ContainerRuntime: Ok
Kubernetes: Ok OK
Kubernetes APIs: ["networking.k8s.io/v1beta1::Ingress", "core/v1::Node", "CustomResourceDefinition", "cilium/v2::CiliumNetworkPolicy", "networking.k8s.io/v1::NetworkPolicy", "core/v1::Service", "core/v1::Endpoint"]
Cilium: Ok OK
NodeMonitor: Listening for events on 2 CPUs with 64x4096 of shared memory
Cilium health daemon: Ok
Controller Status: 7/7 healthy
Proxy Status: OK, ip 10.15.28.238, 0 redirects, port-range 10000-20000
Cluster health: 1/1 reachable (2018-02-27T00:24:34Z)
Detailed information about the status of Cilium can be inspected with the
cilium-dbg status --verbose command. Verbose output includes detailed IPAM state
(allocated addresses), Cilium controller status, and details of the Proxy
status.
Logs
To retrieve log files of a cilium pod, run (replace cilium-1234 with a pod
name returned by kubectl -n kube-system get pods -l k8s-app=cilium)
kubectl -n kube-system logs --timestamps cilium-1234
If the cilium pod was already restarted due to the liveness problem after encountering an issue, it can be useful to retrieve the logs of the pod before the last restart:
kubectl -n kube-system logs --timestamps -p cilium-1234
Generic
When logged in a host running Cilium, the cilium CLI can be invoked directly, e.g.:
$ cilium-dbg status
KVStore:                Ok   etcd: 1/1 connected: https://192.168.60.11:2379 - 3.2.7 (Leader)
ContainerRuntime:       Ok
Kubernetes:             Ok   OK
Kubernetes APIs:        ["core/v1::Endpoint", "networking.k8s.io/v1beta1::Ingress", "core/v1::Node", "CustomResourceDefinition", "cilium/v2::CiliumNetworkPolicy", "networking.k8s.io/v1::NetworkPolicy", "core/v1::Service"]
Cilium:                 Ok   OK
NodeMonitor:            Listening for events on 2 CPUs with 64x4096 of shared memory
Cilium health daemon:   Ok
IPv4 address pool:      261/65535 allocated
IPv6 address pool:      4/4294967295 allocated
Controller Status:      20/20 healthy
Proxy Status:           OK, ip 10.0.28.238, port-range 10000-20000
Hubble:                 Ok      Current/Max Flows: 2542/4096 (62.06%), Flows/s: 164.21      Metrics: Disabled
Cluster health:         2/2 reachable   (2018-04-11T15:41:01Z)
Observing Flows with Hubble
Hubble is a built-in observability tool which allows you to inspect recent flow events on all endpoints managed by Cilium.
Ensure Hubble is running correctly
To ensure the Hubble client can connect to the Hubble server running inside
Cilium, you may use the hubble status command from within a Cilium pod:
$ hubble status
Healthcheck (via unix:///var/run/cilium/hubble.sock): Ok
Current/Max Flows: 4095/4095 (100.00%)
Flows/s: 164.21
cilium-agent must be running with the --enable-hubble option (default) in order
for the Hubble server to be enabled. When deploying Cilium with Helm, make sure
to set the hubble.enabled=true value.
To check if Hubble is enabled in your deployment, you may look for the
following output in cilium-dbg status:
$ cilium status
...
Hubble:   Ok   Current/Max Flows: 4095/4095 (100.00%), Flows/s: 164.21   Metrics: Disabled
...
Note
Pods need to be managed by Cilium in order to be observable by Hubble. See how to ensure a pod is managed by Cilium for more details.
Observing flows of a specific pod
In order to observe the traffic of a specific pod, you will first have to
retrieve the name of the cilium instance managing it.
The Hubble CLI is part of the Cilium container image and can be accessed via
kubectl exec. The following query for example will show all events related
to flows which either originated or terminated in the default/tiefighter pod
in the last three minutes:
$ kubectl exec -n kube-system cilium-77lk6 -- hubble observe --since 3m --pod default/tiefighter
May  4 12:47:08.811: default/tiefighter:53875 -> kube-system/coredns-74ff55c5b-66f4n:53 to-endpoint FORWARDED (UDP)
May  4 12:47:08.811: default/tiefighter:53875 -> kube-system/coredns-74ff55c5b-66f4n:53 to-endpoint FORWARDED (UDP)
May  4 12:47:08.811: default/tiefighter:53875 <- kube-system/coredns-74ff55c5b-66f4n:53 to-endpoint FORWARDED (UDP)
May  4 12:47:08.811: default/tiefighter:53875 <- kube-system/coredns-74ff55c5b-66f4n:53 to-endpoint FORWARDED (UDP)
May  4 12:47:08.811: default/tiefighter:50214 <> default/deathstar-c74d84667-cx5kp:80 to-overlay FORWARDED (TCP Flags: SYN)
May  4 12:47:08.812: default/tiefighter:50214 <- default/deathstar-c74d84667-cx5kp:80 to-endpoint FORWARDED (TCP Flags: SYN, ACK)
May  4 12:47:08.812: default/tiefighter:50214 <> default/deathstar-c74d84667-cx5kp:80 to-overlay FORWARDED (TCP Flags: ACK)
May  4 12:47:08.812: default/tiefighter:50214 <> default/deathstar-c74d84667-cx5kp:80 to-overlay FORWARDED (TCP Flags: ACK, PSH)
May  4 12:47:08.812: default/tiefighter:50214 <- default/deathstar-c74d84667-cx5kp:80 to-endpoint FORWARDED (TCP Flags: ACK, PSH)
May  4 12:47:08.812: default/tiefighter:50214 <> default/deathstar-c74d84667-cx5kp:80 to-overlay FORWARDED (TCP Flags: ACK, FIN)
May  4 12:47:08.812: default/tiefighter:50214 <- default/deathstar-c74d84667-cx5kp:80 to-endpoint FORWARDED (TCP Flags: ACK, FIN)
May  4 12:47:08.812: default/tiefighter:50214 <> default/deathstar-c74d84667-cx5kp:80 to-overlay FORWARDED (TCP Flags: ACK)
You may also use -o json to obtain more detailed information about each
flow event.
Note
Hubble Relay allows you to query multiple Hubble instances simultaneously without having to first manually target a specific node. See Observing flows with Hubble Relay for more information.
Observing flows with Hubble Relay
Hubble Relay is a service which allows to query multiple Hubble instances simultaneously and aggregate the results. See Setting up Hubble Observability to enable Hubble Relay if it is not yet enabled and install the Hubble CLI on your local machine.
Note
The following commands use the -P (--port-forward) flag to automatically
port-forward the Hubble Relay service from your local machine on port 4245.
You can also omit the flag and create a port-forward manually with the Cilium CLI:
$ cilium hubble port-forward
ℹ️ Hubble Relay is available at 127.0.0.1:4245
Or with kubectl:
$ kubectl -n kube-system port-forward service/hubble-relay 4245:80
Forwarding from 127.0.0.1:4245 -> 4245
Forwarding from [::1]:4245 -> 4245
For more information on this method, see Use Port Forwarding to Access Application in a Cluster.
You can verify that Hubble Relay can be reached by using the Hubble CLI and running the following command from your local machine:
hubble status -P
This command should return an output similar to the following:
Healthcheck (via 127.0.0.1:4245): Ok
Current/Max Flows: 16380/16380 (100.00%)
Flows/s: 46.19
Connected Nodes: 4/4
You may see details about nodes that Hubble Relay is connected to by running the following command:
$ hubble list nodes -P
NAME              STATUS      AGE     FLOWS/S   CURRENT/MAX-FLOWS
cluster/node-cp   Connected   2m30s   13.94     2227/4095 ( 54.38%)
cluster/node-w1   Connected   2m31s   51.37     5108/9840 ( 51.91%)
As Hubble Relay shares the same API as individual Hubble instances, you may follow the Observing flows with Hubble section keeping in mind that limitations with regards to what can be seen from individual Hubble instances no longer apply.
Connectivity Problems
Cilium connectivity tests
The Cilium connectivity test deploys a series of services, deployments, and CiliumNetworkPolicy which will use various connectivity paths to connect to each other. Connectivity paths include with and without service load-balancing and various network policy combinations.
Note
The connectivity tests this will only work in a namespace with no other pods or network policies applied. If there is a Cilium Clusterwide Network Policy enabled, that may also break this connectivity check.
To run the connectivity tests create an isolated test namespace called
cilium-test to deploy the tests with.
kubectl create ns cilium-test
kubectl apply --namespace=cilium-test -f https://raw.githubusercontent.com/cilium/cilium/1.19.6/examples/kubernetes/connectivity-check/connectivity-check.yaml
The tests cover various functionality of the system. Below we call out each test type. If tests pass, it suggests functionality of the referenced subsystem.
Pod-to-pod (intra-host) |
Pod-to-pod (inter-host) |
Pod-to-service (intra-host) |
Pod-to-service (inter-host) |
Pod-to-external resource |
|---|---|---|---|---|
eBPF routing is functional |
Data plane, routing, network |
eBPF service map lookup |
VXLAN overlay port if used |
Egress, CiliumNetworkPolicy, masquerade |
The pod name indicates the connectivity variant and the readiness and liveness gate indicates success or failure of the test:
$ kubectl get pods -n cilium-test
NAME                                                    READY   STATUS    RESTARTS   AGE
echo-a-6788c799fd-42qxx                                 1/1     Running   0          69s
echo-b-59757679d4-pjtdl                                 1/1     Running   0          69s
echo-b-host-f86bd784d-wnh4v                             1/1     Running   0          68s
host-to-b-multi-node-clusterip-585db65b4d-x74nz         1/1     Running   0          68s
host-to-b-multi-node-headless-77c64bc7d8-kgf8p          1/1     Running   0          67s
pod-to-a-allowed-cnp-87b5895c8-bfw4x                    1/1     Running   0          68s
pod-to-a-b76ddb6b4-2v4kb                                1/1     Running   0          68s
pod-to-a-denied-cnp-677d9f567b-kkjp4                    1/1     Running   0          68s
pod-to-b-intra-node-nodeport-8484fb6d89-bwj8q           1/1     Running   0          68s
pod-to-b-multi-node-clusterip-f7655dbc8-h5bwk           1/1     Running   0          68s
pod-to-b-multi-node-headless-5fd98b9648-5bjj8           1/1     Running   0          68s
pod-to-b-multi-node-nodeport-74bd8d7bd5-kmfmm           1/1     Running   0          68s
pod-to-external-1111-7489c7c46d-jhtkr                   1/1     Running   0          68s
pod-to-external-fqdn-allow-google-cnp-b7b6bcdcb-97p75   1/1     Running   0          68s
Information about test failures can be determined by describing a failed test pod
$ kubectl describe pod pod-to-b-intra-node-hostport
  Warning  Unhealthy  6s (x6 over 56s)   kubelet, agent1    Readiness probe failed: curl: (7) Failed to connect to echo-b-host-headless port 40000: Connection refused
  Warning  Unhealthy  2s (x3 over 52s)   kubelet, agent1    Liveness probe failed: curl: (7) Failed to connect to echo-b-host-headless port 40000: Connection refused
Checking cluster connectivity health
Cilium can rule out network fabric related issues when troubleshooting connectivity issues by providing reliable health and latency probes between all cluster nodes and a simulated workload running on each node.
By default when Cilium is run, it launches instances of cilium-health in
the background to determine the overall connectivity status of the cluster. This
tool periodically runs bidirectional traffic across multiple paths through the
cluster and through each node using different protocols to determine the health
status of each path and protocol. At any point in time, cilium-health may be
queried for the connectivity status of the last probe.
$ kubectl -n kube-system exec -ti cilium-2hq5z -- cilium-health status --verbose
Probe time:   2018-06-16T09:51:58Z
Nodes:
  ip-172-0-52-116.us-west-2.compute.internal (localhost):
    Host connectivity to 172.0.52.116:
      ICMP to stack: OK, RTT=315.254µs
      HTTP to agent: OK, RTT=368.579µs
    Endpoint connectivity to 10.2.0.183:
      ICMP to stack: OK, RTT=190.658µs
      HTTP to agent: OK, RTT=536.665µs
  ip-172-0-117-198.us-west-2.compute.internal:
    Host connectivity to 172.0.117.198:
      ICMP to stack: OK, RTT=1.009679ms
      HTTP to agent: OK, RTT=1.808628ms
    Endpoint connectivity to 10.2.1.234:
      ICMP to stack: OK, RTT=1.016365ms
      HTTP to agent: OK, RTT=2.29877ms
For each node, the connectivity will be displayed for each protocol and path,
both to the node itself and to an endpoint on that node. The latency specified
is a snapshot at the last time a probe was run, which is typically once per
minute. The ICMP connectivity row represents Layer 3 connectivity to the
networking stack, while the HTTP connectivity row represents connection to an
instance of the cilium-health agent running on the host or as an endpoint.
Monitoring Datapath State
Sometimes you may experience broken connectivity, which may be due to a
number of different causes. A main cause can be unwanted packet drops on
the networking level. The tool
cilium-dbg monitor allows you to quickly inspect and see if and where packet
drops happen. Following is an example output (use kubectl exec as in
previous examples if running with Kubernetes):
$ kubectl -n kube-system exec -ti cilium-2hq5z -- cilium-dbg monitor --type drop
Listening for events on 2 CPUs with 64x4096 of shared memory
Press Ctrl-C to quit
xx drop (Policy denied) to endpoint 25729, identity 261->264: fd02::c0a8:210b:0:bf00 -> fd02::c0a8:210b:0:6481 EchoRequest
xx drop (Policy denied) to endpoint 25729, identity 261->264: fd02::c0a8:210b:0:bf00 -> fd02::c0a8:210b:0:6481 EchoRequest
xx drop (Policy denied) to endpoint 25729, identity 261->264: 10.11.13.37 -> 10.11.101.61 EchoRequest
xx drop (Policy denied) to endpoint 25729, identity 261->264: 10.11.13.37 -> 10.11.101.61 EchoRequest
xx drop (Invalid destination mac) to endpoint 0, identity 0->0: fe80::5c25:ddff:fe8e:78d8 -> ff02::2 RouterSolicitation
The above indicates that a packet to endpoint ID 25729 has been dropped due
to violation of the Layer 3 policy.
Handling drop (CT: Map insertion failed)
If connectivity fails and cilium-dbg monitor --type drop shows xx drop (CT:
Map insertion failed), then it is likely that the connection tracking table
is filling up and the automatic adjustment of the garbage collector interval is
insufficient.
Setting --conntrack-gc-interval to an interval lower than the current value
may help. This controls the time interval between two garbage collection runs.
By default --conntrack-gc-interval is set to 0 which translates to
using a dynamic interval. In that case, the interval is updated after each
garbage collection run depending on how many entries were garbage collected.
If very few or no entries were garbage collected, the interval will increase;
if many entries were garbage collected, it will decrease. The current interval
value is reported in the Cilium agent logs.
Alternatively, the value for bpf-ct-global-any-max and
bpf-ct-global-tcp-max can be increased. Setting both of these options will
be a trade-off of CPU for conntrack-gc-interval, and for
bpf-ct-global-any-max and bpf-ct-global-tcp-max the amount of memory
consumed. You can track conntrack garbage collection related metrics such as
datapath_conntrack_gc_runs_total and datapath_conntrack_gc_entries to
get visibility into garbage collection runs. Refer to Monitoring & Metrics for more
details.
Enabling datapath debug messages
By default, datapath debug messages are disabled, and therefore not shown in
cilium-dbg monitor -v output. To enable them, add "datapath" to
the debug-verbose option.
Policy Troubleshooting
Ensure pod is managed by Cilium
A potential cause for policy enforcement not functioning as expected is that the networking of the pod selected by the policy is not being managed by Cilium. The following situations result in unmanaged pods:
The pod is running in host networking and will use the host’s IP address directly. Such pods have full network connectivity but Cilium will not provide security policy enforcement for such pods by default. To enforce policy against these pods, either set
hostNetworkto false or use Host Policies.The pod was started before Cilium was deployed. Cilium only manages pods that have been deployed after Cilium itself was started. Cilium will not provide security policy enforcement for such pods. These pods should be restarted in order to ensure that Cilium can provide security policy enforcement.
If pod networking is not managed by Cilium. Ingress and egress policy rules selecting the respective pods will not be applied. See the section Overview of Network Policy for more details.
For a quick assessment of whether any pods are not managed by Cilium, the Cilium CLI will print the number of managed pods. If this prints that all of the pods are managed by Cilium, then there is no problem:
$ cilium status
    /¯¯\
 /¯¯\__/¯¯\    Cilium:         OK
 \__/¯¯\__/    Operator:       OK
 /¯¯\__/¯¯\    Hubble:         OK
 \__/¯¯\__/    ClusterMesh:    disabled
    \__/

Deployment        cilium-operator    Desired: 2, Ready: 2/2, Available: 2/2
Deployment        hubble-relay       Desired: 1, Ready: 1/1, Available: 1/1
Deployment        hubble-ui          Desired: 1, Ready: 1/1, Available: 1/1
DaemonSet         cilium             Desired: 2, Ready: 2/2, Available: 2/2
Containers:       cilium-operator    Running: 2
                  hubble-relay       Running: 1
                  hubble-ui          Running: 1
                  cilium             Running: 2
Cluster Pods:     5/5 managed by Cilium
...
You can run the following script to list the pods which are not managed by Cilium:
$ curl -sLO https://raw.githubusercontent.com/cilium/cilium/main/contrib/k8s/k8s-unmanaged.sh
$ chmod +x k8s-unmanaged.sh
$ ./k8s-unmanaged.sh
kube-system/cilium-hqpk7
kube-system/kube-addon-manager-minikube
kube-system/kube-dns-54cccfbdf8-zmv2c
kube-system/kubernetes-dashboard-77d8b98585-g52k5
kube-system/storage-provisioner
Understand the rendering of your policy
There are always multiple ways to approach a problem. Cilium can provide the rendering of the aggregate policy provided to it, leaving you to simply compare with what you expect the policy to actually be rather than search (and potentially overlook) every policy. At the expense of reading a very large dump of an endpoint, this is often a faster path to discovering errant policy requests in the Kubernetes API.
Start by finding the endpoint you are debugging from the following list. There are several cross references for you to use in this list, including the IP address and pod labels:
kubectl -n kube-system exec -ti cilium-q8wvt -- cilium-dbg endpoint list
When you find the correct endpoint, the first column of every row is the endpoint ID. Use that to dump the full endpoint information:
kubectl -n kube-system exec -ti cilium-q8wvt -- cilium-dbg endpoint get 59084
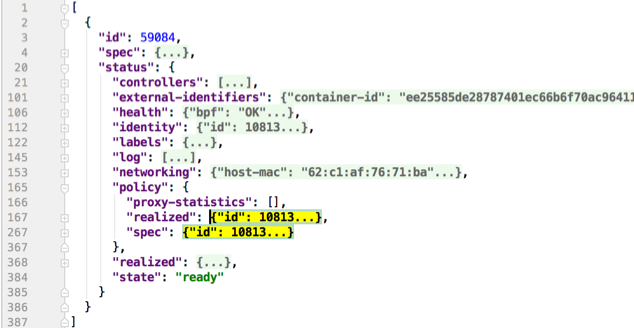
Importing this dump into a JSON-friendly editor can help browse and navigate the information here. At the top level of the dump, there are two nodes of note:
spec: The desired state of the endpointstatus: The current state of the endpoint
This is the standard Kubernetes control loop pattern. Cilium is the controller
here, and it is iteratively working to bring the status in line with the
spec.
Opening the status, we can drill down through policy.realized.l4. Do
your ingress and egress rules match what you expect? If not, the
reference to the errant rules can be found in the derived-from-rules node.
Policymap pressure and overflow
The most important step in debugging policymap pressure is finding out which node(s) are impacted.
The cilium_bpf_map_pressure{map_name="cilium_policy_v2_*"} metric monitors the
endpoint’s BPF policymap pressure. This metric exposes the maximum BPF map
pressure on the node, meaning the policymap experiencing the most pressure on a
particular node.
Once the node is known, the troubleshooting steps are as follows:
Find the Cilium pod on the node experiencing the problematic policymap pressure and obtain a shell via
kubectl exec.Use
cilium policy selectorsto get an overview of which selectors are selecting many identities.The type of selector tells you what sort of policy rule could be having an impact. The three existing types of selectors are explained below, each with specific steps depending on the selector. See the steps below corresponding to the type of selector.
Consider bumping the policymap size as a last resort. However, keep in mind the following implications:
Increased memory consumption for each policymap.
Generally, as identities increase in the cluster, the more work Cilium performs.
At a broader level, if the policy posture is such that all or nearly all identities are selected, this suggests that the posture is too permissive.
Selector type |
Form in |
|---|---|
CIDR |
|
FQDN |
|
Label |
|
An example output of cilium policy selectors:
root@kind-worker:/home/cilium# cilium policy selectors
SELECTOR                                                                                                                                                            LABELS                          USERS   IDENTITIES
&LabelSelector{MatchLabels:map[string]string{k8s.io.kubernetes.pod.namespace: kube-system,k8s.k8s-app: kube-dns,},MatchExpressions:[]LabelSelectorRequirement{},}   default/tofqdn-dns-visibility   1       16500
&LabelSelector{MatchLabels:map[string]string{reserved.none: ,},MatchExpressions:[]LabelSelectorRequirement{},}                                                      default/tofqdn-dns-visibility   1
MatchName: , MatchPattern: *                                                                                                                                        default/tofqdn-dns-visibility   1       16777231
                                                                                                                                                                                                            16777232
                                                                                                                                                                                                            16777233
                                                                                                                                                                                                            16860295
                                                                                                                                                                                                            16860322
                                                                                                                                                                                                            16860323
                                                                                                                                                                                                            16860324
                                                                                                                                                                                                            16860325
                                                                                                                                                                                                            16860326
                                                                                                                                                                                                            16860327
                                                                                                                                                                                                            16860328
&LabelSelector{MatchLabels:map[string]string{any.name: netperf,k8s.io.kubernetes.pod.namespace: default,},MatchExpressions:[]LabelSelectorRequirement{},}           default/tofqdn-dns-visibility   1
&LabelSelector{MatchLabels:map[string]string{cidr.1.1.1.1/32: ,},MatchExpressions:[]LabelSelectorRequirement{},}                                                    default/tofqdn-dns-visibility   1       16860329
&LabelSelector{MatchLabels:map[string]string{cidr.1.1.1.2/32: ,},MatchExpressions:[]LabelSelectorRequirement{},}                                                    default/tofqdn-dns-visibility   1       16860330
&LabelSelector{MatchLabels:map[string]string{cidr.1.1.1.3/32: ,},MatchExpressions:[]LabelSelectorRequirement{},}                                                    default/tofqdn-dns-visibility   1       16860331
From the output above, we see that all three selectors are in use. The significant action here is to determine which selector is selecting the most identities, because the policy containing that selector is the likely cause for the policymap pressure.
Label
See section on identity-relevant labels.
Another aspect to consider is the permissiveness of the policies and whether it could be reduced.
CIDR
One way to reduce the number of identities selected by a CIDR selector is to
broaden the range of the CIDR, if possible. For example, in the above example
output, the policy contains a /32 rule for each CIDR, rather than using a
wider range like /30 instead. Updating the policy with this rule creates an
identity that represents all IPs within the /30 and therefore, only
requires the selector to select 1 identity.
FQDN
See section on isolating the source of toFQDNs issues regarding identities and policy.
etcd (kvstore)
Introduction
Cilium can be operated in CRD-mode and kvstore/etcd mode. When cilium is running in kvstore/etcd mode, the kvstore becomes a vital component of the overall cluster health as it is required to be available for several operations.
Operations for which the kvstore is strictly required when running in etcd mode:
- Scheduling of new workloads:
As part of scheduling workloads/endpoints, agents will perform security identity allocation which requires interaction with the kvstore. If a workload can be scheduled due to re-using a known security identity, then state propagation of the endpoint details to other nodes will still depend on the kvstore and thus packets drops due to policy enforcement may be observed as other nodes in the cluster will not be aware of the new workload.
- Multi cluster:
All state propagation between clusters depends on the kvstore.
- Node discovery:
New nodes require to register themselves in the kvstore.
- Agent bootstrap:
The Cilium agent will eventually fail if it can’t connect to the kvstore at bootstrap time, however, the agent will still perform all possible operations while waiting for the kvstore to appear.
Operations which do not require kvstore availability:
- All datapath operations:
All datapath forwarding, policy enforcement and visibility functions for existing workloads/endpoints do not depend on the kvstore. Packets will continue to be forwarded and network policy rules will continue to be enforced.
However, if the agent requires to restart as part of the Recovery behavior, there can be delays in:
processing of flow events and metrics
short unavailability of layer 7 proxies
- NetworkPolicy updates:
Network policy updates will continue to be processed and applied.
- Services updates:
All updates to services will be processed and applied.
Understanding etcd status
The etcd status is reported when running cilium-dbg status. The following line
represents the status of etcd:
KVStore: Ok etcd: 1/1 connected, lease-ID=29c6732d5d580cb5, lock lease-ID=29c6732d5d580cb7, has-quorum=true: https://192.168.60.11:2379 - 3.4.9 (Leader)
- OK:
The overall status. Either
OKorFailure.- 1/1 connected:
Number of total etcd endpoints and how many of them are reachable.
- lease-ID:
UUID of the lease used for all keys owned by this agent.
- lock lease-ID:
UUID of the lease used for locks acquired by this agent.
- has-quorum:
Status of etcd quorum. Either
trueor set to an error.- consecutive-errors:
Number of consecutive quorum errors. Only printed if errors are present.
- https://192.168.60.11:2379 - 3.4.9 (Leader):
List of all etcd endpoints stating the etcd version and whether the particular endpoint is currently the elected leader. If an etcd endpoint cannot be reached, the error is shown.
Recovery behavior
In the event of an etcd endpoint becoming unhealthy, etcd should automatically resolve this by electing a new leader and by failing over to a healthy etcd endpoint. As long as quorum is preserved, the etcd cluster will remain functional.
In addition, Cilium performs a background check in an interval to determine etcd health and potentially take action. The interval depends on the overall cluster size. The larger the cluster, the longer the interval:
If no etcd endpoints can be reached, Cilium will report failure in
cilium-dbg
status
. This will cause the liveness and readiness probe of Kubernetes to fail and Cilium will be restarted.A lock is acquired and released to test a write operation which requires quorum. If this operation fails, loss of quorum is reported. If quorum fails for three or more intervals in a row, Cilium is declared unhealthy.
The Cilium operator will constantly write to a heartbeat key (
cilium/.heartbeat). All Cilium agents will watch for updates to this heartbeat key. This validates the ability for an agent to receive key updates from etcd. If the heartbeat key is not updated in time, the quorum check is declared to have failed and Cilium is declared unhealthy after 3 or more consecutive failures.
Example of a status with a quorum failure which has not yet reached the threshold:
KVStore: Ok etcd: 1/1 connected, lease-ID=29c6732d5d580cb5, lock lease-ID=29c6732d5d580cb7, has-quorum=2m2.778966915s since last heartbeat update has been received, consecutive-errors=1: https://192.168.60.11:2379 - 3.4.9 (Leader)
Example of a status with the number of quorum failures exceeding the threshold:
KVStore: Failure Err: quorum check failed 8 times in a row: 4m28.446600949s since last heartbeat update has been received
Cluster Mesh Troubleshooting
Install the Cilium CLI
Install the latest version of the Cilium CLI. The Cilium CLI can be used to install Cilium, inspect the state of a Cilium installation, and enable/disable various features (e.g. clustermesh, Hubble).
CILIUM_CLI_VERSION=$(curl -s https://raw.githubusercontent.com/cilium/cilium-cli/main/stable.txt)
CLI_ARCH=amd64
if [ "$(uname -m)" = "aarch64" ]; then CLI_ARCH=arm64; fi
curl -L --fail --remote-name-all https://github.com/cilium/cilium-cli/releases/download/${CILIUM_CLI_VERSION}/cilium-linux-${CLI_ARCH}.tar.gz{,.sha256sum}
sha256sum --check cilium-linux-${CLI_ARCH}.tar.gz.sha256sum
sudo tar xzvfC cilium-linux-${CLI_ARCH}.tar.gz /usr/local/bin
rm cilium-linux-${CLI_ARCH}.tar.gz{,.sha256sum}
CILIUM_CLI_VERSION=$(curl -s https://raw.githubusercontent.com/cilium/cilium-cli/main/stable.txt)
CLI_ARCH=amd64
if [ "$(uname -m)" = "arm64" ]; then CLI_ARCH=arm64; fi
curl -L --fail --remote-name-all https://github.com/cilium/cilium-cli/releases/download/${CILIUM_CLI_VERSION}/cilium-darwin-${CLI_ARCH}.tar.gz{,.sha256sum}
shasum -a 256 -c cilium-darwin-${CLI_ARCH}.tar.gz.sha256sum
sudo tar xzvfC cilium-darwin-${CLI_ARCH}.tar.gz /usr/local/bin
rm cilium-darwin-${CLI_ARCH}.tar.gz{,.sha256sum}
See the full page of releases.
Automatic Verification
Validate that Cilium pods are healthy and ready:
cilium statusValidate that Cluster Mesh is enabled and operational:
cilium clustermesh statusIn case of errors, run the troubleshoot command to automatically investigate Cilium agents connectivity issues towards the ClusterMesh control plane in remote clusters:
kubectl exec -it -n kube-system ds/cilium -c cilium-agent -- cilium-dbg troubleshoot clustermeshThe troubleshoot command performs a set of automatic checks to validate DNS resolution, network connectivity, TLS authentication, etcd authorization and more, and reports the output in a user friendly format.
When KVStoreMesh is enabled, the output of the troubleshoot command refers to the connections from the agents to the local cache, and it is expected to be the same for all the clusters they are connected to. Run the troubleshoot command inside the clustermesh-apiserver to investigate KVStoreMesh connectivity issues towards the ClusterMesh control plane in remote clusters:
kubectl exec -it -n kube-system deploy/clustermesh-apiserver -c kvstoremesh -- \
  clustermesh-apiserver kvstoremesh-dbg troubleshoot
Tip
You can specify one or more cluster names as parameters of the troubleshoot command to run the checks only towards a subset of remote clusters.
Manual Verification
As an alternative to leveraging the tools presented in the previous section, you may perform the following steps to troubleshoot ClusterMesh issues.
Validate that each cluster is assigned a unique human-readable name as well as a numeric cluster ID (1-255).
Validate that the clustermesh-apiserver is initialized correctly for each cluster:
$ kubectl logs -n kube-system deployment/clustermesh-apiserver -c apiserver
...
level=info msg="Connecting to etcd server..." config=/var/lib/cilium/etcd-config.yaml endpoints="[https://127.0.0.1:2379]" subsys=kvstore
level=info msg="Got lock lease ID 7c0281854b945c07" subsys=kvstore
level=info msg="Initial etcd session established" config=/var/lib/cilium/etcd-config.yaml endpoints="[https://127.0.0.1:2379]" subsys=kvstore
level=info msg="Successfully verified version of etcd endpoint" config=/var/lib/cilium/etcd-config.yaml endpoints="[https://127.0.0.1:2379]" etcdEndpoint="https://127.0.0.1:2379" subsys=kvstore version=3.4.13
Validate that ClusterMesh is healthy running
cilium-dbg status --all-clustersinside each Cilium agent:ClusterMesh: 1/1 remote clusters ready k8s-c2: ready, 3 nodes, 25 endpoints, 8 identities, 10 services, 0 MCS-API service exports, 0 reconnections (last: never) └ etcd: 1/1 connected, leases=0, lock lease-ID=7c028201b53de662, has-quorum=true: https://k8s-c2.mesh.cilium.io:2379 - 3.5.4 (Leader) └ remote configuration: expected=true, retrieved=true, cluster-id=3, kvstoremesh=false, sync-canaries=true, service-exports=disabled └ synchronization status: nodes=true, endpoints=true, identities=true, services=trueWhen KVStoreMesh is enabled, additionally check its status and validate that it is correctly connected to all remote clusters:
$ kubectl --context $CLUSTER1 exec -it -n kube-system deploy/clustermesh-apiserver \
    -c kvstoremesh -- clustermesh-apiserver kvstoremesh-dbg status --verbose
Validate that the required TLS secrets are set up properly. By default, the following TLS secrets must be available in the namespace in which Cilium is installed:
clustermesh-apiserver-server-cert, which is used by the etcd container in the clustermesh-apiserver deployment. Not applicable if an external etcd cluster is used.
clustermesh-apiserver-admin-cert, which is used by the apiserver/kvstoremesh containers in the clustermesh-apiserver deployment, to authenticate against the sidecar etcd instance. Not applicable if an external etcd cluster is used.
clustermesh-apiserver-remote-cert, which is used by Cilium agents, or the kvstoremesh container in the clustermesh-apiserver deployment when KVStoreMesh is enabled, to authenticate against remote etcd instances.
clustermesh-apiserver-local-cert, which is used by Cilium agents to authenticate against the local etcd instance. Only applicable if KVStoreMesh is enabled.Validate that the configuration for remote clusters is picked up correctly. For each remote cluster, an info log message
New remote cluster
configuration
along with the remote cluster name must be logged in thecilium-agentlogs.If the configuration is not found, check the following:
The
cilium-clustermeshKubernetes secret is present and correctly mounted by the Cilium agent pods.The secret contains a file for each remote cluster with the filename matching the name of the remote cluster as provided by the
--cluster-nameargument or thecluster-nameConfigMap option.Each file named after a remote cluster contains a valid etcd configuration consisting of the endpoints to reach the remote etcd cluster, and the path of the certificate and private key to authenticate against that etcd cluster. Additional files may be included in the secret to provide the certificate and private key themselves.
The
/var/lib/cilium/clustermeshdirectory inside any of the Cilium agent pods contains the files mounted from thecilium-clustermeshsecret. You can usekubectl exec -ti -n kube-system ds/cilium -c cilium-agent -- ls /var/lib/cilium/clustermeshto list the files present.Validate that the connection to the remote cluster could be established. You will see a log message like this in the
cilium-agentlogs for each remote cluster:level=info msg="Connection to remote cluster established"If the connection failed, you will see a warning like this:
level=warning msg="Unable to establish etcd connection to remote cluster"If the connection fails, check the following:
When KVStoreMesh is disabled, validate that the
hostAliasessection in the Cilium DaemonSet maps each remote cluster to the IP of the LoadBalancer that makes the remote control plane available; When KVStoreMesh is enabled, validate thehostAliasessection in the clustermesh-apiserver Deployment.Validate that a local node in the source cluster can reach the IP specified in the
hostAliasessection. When KVStoreMesh is disabled, thecilium-clustermeshsecret contains a configuration file for each remote cluster, it will point to a logical name representing the remote cluster; When KVStoreMesh is enabled, it exists in thecilium-kvstoremeshsecret.endpoints: - https://cluster1.mesh.cilium.io:2379The name will NOT be resolvable via DNS outside the Cilium agent pods. The name is mapped to an IP using
hostAliases. Runkubectl -n kube-system get daemonset cilium -o yamlwhen KVStoreMesh is disabled, or runkubectl -n kube-system get deployment clustermesh-apiserver -o yamlwhen KVStoreMesh is enabled, grep for the FQDN to retrieve the IP that is configured. Then usecurlto validate that the port is reachable.A firewall between the local cluster and the remote cluster may drop the control plane connection. Ensure that port 2379/TCP is allowed.
State Propagation
Run
cilium-dbg node listin one of the Cilium pods and validate that it lists both local nodes and nodes from remote clusters. If remote nodes are not present, validate that Cilium agents (or KVStoreMesh, if enabled) are correctly connected to the given remote cluster. Additionally, verify that the initial nodes synchronization from all clusters has completed.Validate the connectivity health matrix across clusters by running
cilium-health statusinside any Cilium pod. It will list the status of the connectivity health check to each remote node. If this fails, make sure that the network allows the health checking traffic as specified in the Firewall Rules section.Validate that identities are synchronized correctly by running
cilium-dbg
identity list
in one of the Cilium pods. It must list identities from all clusters. You can determine what cluster an identity belongs to by looking at the labelio.cilium.k8s.policy.cluster. If remote identities are not present, validate that Cilium agents (or KVStoreMesh, if enabled) are correctly connected to the given remote cluster. Additionally, verify that the initial identities synchronization from all clusters has completed.Validate that the IP cache is synchronized correctly by running
cilium-dbg bpf ipcache listorcilium-dbg map get cilium_ipcache. The output must contain pod IPs from local and remote clusters. If remote IP addresses are not present, validate that Cilium agents (or KVStoreMesh, if enabled) are correctly connected to the given remote cluster. Additionally, verify that the initial IPs synchronization from all clusters has completed.When using global services, ensure that global services are configured with endpoints from all clusters. Run
cilium-dbg service listin any Cilium pod and validate that the backend IPs consist of pod IPs from all clusters running relevant backends. You can further validate the correct datapath plumbing by runningcilium-dbg bpf lb listto inspect the state of the eBPF maps.If this fails:
Run
cilium-dbg debuginfoand look for the sectionk8s-service-cache. In that section, you will find the contents of the service correlation cache. It will list the Kubernetes services and endpoints of the local cluster. It will also have a sectionexternalEndpointswhich must list all endpoints of remote clusters.#### k8s-service-cache (*k8s.ServiceCache)(0xc00000c500)({ [...] services: (map[k8s.ServiceID]*k8s.Service) (len=2) { (k8s.ServiceID) default/kubernetes: (*k8s.Service)(0xc000cd11d0)(frontend:172.20.0.1/ports=[https]/selector=map[]), (k8s.ServiceID) kube-system/kube-dns: (*k8s.Service)(0xc000cd1220)(frontend:172.20.0.10/ports=[metrics dns dns-tcp]/selector=map[k8s-app:kube-dns]) }, endpoints: (map[k8s.ServiceID]*k8s.Endpoints) (len=2) { (k8s.ServiceID) kube-system/kube-dns: (*k8s.Endpoints)(0xc0000103c0)(10.16.127.105:53/TCP,10.16.127.105:53/UDP,10.16.127.105:9153/TCP), (k8s.ServiceID) default/kubernetes: (*k8s.Endpoints)(0xc0000103f8)(192.168.60.11:6443/TCP) }, externalEndpoints: (map[k8s.ServiceID]k8s.externalEndpoints) { } })The sections
servicesandendpointsrepresent the services of the local cluster, the sectionexternalEndpointslists all remote services and will be correlated with services matching the sameServiceID.
Service Mesh Troubleshooting
Install the Cilium CLI
Install the latest version of the Cilium CLI. The Cilium CLI can be used to install Cilium, inspect the state of a Cilium installation, and enable/disable various features (e.g. clustermesh, Hubble).
CILIUM_CLI_VERSION=$(curl -s https://raw.githubusercontent.com/cilium/cilium-cli/main/stable.txt)
CLI_ARCH=amd64
if [ "$(uname -m)" = "aarch64" ]; then CLI_ARCH=arm64; fi
curl -L --fail --remote-name-all https://github.com/cilium/cilium-cli/releases/download/${CILIUM_CLI_VERSION}/cilium-linux-${CLI_ARCH}.tar.gz{,.sha256sum}
sha256sum --check cilium-linux-${CLI_ARCH}.tar.gz.sha256sum
sudo tar xzvfC cilium-linux-${CLI_ARCH}.tar.gz /usr/local/bin
rm cilium-linux-${CLI_ARCH}.tar.gz{,.sha256sum}
CILIUM_CLI_VERSION=$(curl -s https://raw.githubusercontent.com/cilium/cilium-cli/main/stable.txt)
CLI_ARCH=amd64
if [ "$(uname -m)" = "arm64" ]; then CLI_ARCH=arm64; fi
curl -L --fail --remote-name-all https://github.com/cilium/cilium-cli/releases/download/${CILIUM_CLI_VERSION}/cilium-darwin-${CLI_ARCH}.tar.gz{,.sha256sum}
shasum -a 256 -c cilium-darwin-${CLI_ARCH}.tar.gz.sha256sum
sudo tar xzvfC cilium-darwin-${CLI_ARCH}.tar.gz /usr/local/bin
rm cilium-darwin-${CLI_ARCH}.tar.gz{,.sha256sum}
See the full page of releases.
Generic
Validate that the
ds/ciliumas well as thedeployment/cilium-operatorpods are healthy and ready.$ cilium status
Manual Verification of Setup
Validate that
kubeProxyReplacementis true.$ kubectl exec -n kube-system ds/cilium -- cilium-dbg status ... KubeProxyReplacement: True ...Validate that runtime the values of
enable-envoy-configandenable-ingress-controllerare true. Ingress controller flag is optional if customer only usesCiliumEnvoyConfigorCiliumClusterwideEnvoyConfigCRDs.$ kubectl -n kube-system get cm cilium-config -o json | egrep "enable-ingress-controller|enable-envoy-config" "enable-envoy-config": "true", "enable-ingress-controller": "true",
Ingress Troubleshooting
Internally, the Cilium Ingress controller will create one Load Balancer service, one
CiliumEnvoyConfig and one dummy Endpoint resource for each Ingress resource.
$ kubectl get ingress
NAME            CLASS    HOSTS   ADDRESS        PORTS   AGE
basic-ingress   cilium   *       10.97.60.117   80      16m

# For dedicated Load Balancer mode
$ kubectl get service cilium-ingress-basic-ingress
NAME                           TYPE           CLUSTER-IP     EXTERNAL-IP    PORT(S)        AGE
cilium-ingress-basic-ingress   LoadBalancer   10.97.60.117   10.97.60.117   80:31911/TCP   17m

# For dedicated Load Balancer mode
$ kubectl get cec cilium-ingress-default-basic-ingress
NAME                                   AGE
cilium-ingress-default-basic-ingress   18m

# For shared Load Balancer mode
$ kubectl get services -n kube-system cilium-ingress
NAME             TYPE           CLUSTER-IP      EXTERNAL-IP     PORT(S)                      AGE
cilium-ingress   LoadBalancer   10.111.109.99   10.111.109.99   80:32690/TCP,443:31566/TCP   38m

# For shared Load Balancer mode
$ kubectl get cec -n kube-system cilium-ingress
NAME             AGE
cilium-ingress   15m
Validate that the Load Balancer service has either an external IP or FQDN assigned. If it’s not available after a long time, please check the Load Balancer related documentation from your respective cloud provider.
Check if there is any warning or error message while Cilium is trying to provision the
CiliumEnvoyConfigresource. This is unlikely to happen for CEC resources originating from the Cilium Ingress controller.Note
Note that these Envoy resources are not validated by K8s at all, so any errors in the Envoy resources will only be seen by the Cilium Agent observing these CRDs. This means that
kubectl applywill report success, while parsing and/or installing the resources for the node-local Envoy instance may have failed. Currently the only way of verifying this is by observing Cilium Agent logs for errors and warnings. Additionally, Cilium Agent will print warning logs for any conflicting Envoy resources in the cluster.Note
Note that Cilium Ingress Controller will configure required Envoy resource under the hood. Please check Cilium Agent logs if you are creating Envoy resources explicitly to make sure there is no conflict.
Connectivity Troubleshooting
This section is for troubleshooting connectivity issues mainly for Ingress resources, but
the same steps can be applied to manually configured CiliumEnvoyConfig resources as well.
It’s best to have debug and debug-verbose enabled with below values. Kindly
note that any change of Cilium flags requires a restart of the Cilium agent and operator.
$ kubectl get -n kube-system cm cilium-config -o json | grep "debug"
        "debug": "true",
        "debug-verbose": "flow",
Note
The originating source IP is used for enforcing ingress traffic.
The request normally traverses from LoadBalancer service to pre-assigned port of your node, then gets forwarded to the Cilium Envoy proxy, and finally gets proxied to the actual backend service.
The first step between cloud Load Balancer to node port is out of Cilium scope. Please check related documentation from your respective cloud provider to make sure your clusters are configured properly.
The second step could be checked by connecting with SSH to your underlying host, and sending the similar request to localhost on the relevant port:
$ kubectl get service cilium-ingress-basic-ingress
NAME                           TYPE           CLUSTER-IP     EXTERNAL-IP    PORT(S)        AGE
cilium-ingress-basic-ingress   LoadBalancer   10.97.60.117   10.97.60.117   80:31911/TCP   17m

# After ssh to any of k8s node
$ curl -v http://localhost:31911/
*   Trying 127.0.0.1:31911...
* TCP_NODELAY set
* Connected to localhost (127.0.0.1) port 31911 (#0)
> GET / HTTP/1.1
> Host: localhost:31911
> User-Agent: curl/7.68.0
> Accept: */*
>
* Mark bundle as not supporting multiuse
< HTTP/1.1 503 Service Unavailable
< content-length: 19
< content-type: text/plain
< date: Thu, 07 Jul 2022 12:25:56 GMT
< server: envoy
<
* Connection #0 to host localhost left intact

# Flows for world identity
$ kubectl -n kube-system exec ds/cilium -- hubble observe -f --identity 2
Jul  7 12:28:27.970: 127.0.0.1:54704 <- 127.0.0.1:13681 http-response FORWARDED (HTTP/1.1 503 0ms (GET http://localhost:31911/))
Alternatively, you can also send a request directly to the Envoy proxy port. For Ingress, the proxy port is randomly assigned by the Cilium Ingress controller. For manually configured
CiliumEnvoyConfigresources, the proxy port is retrieved directly from the spec.$ kubectl logs -f -n kube-system ds/cilium --timestamps | egrep "envoy|proxy" ... 2022-07-08T08:05:13.986649816Z level=info msg="Adding new proxy port rules for cilium-ingress-default-basic-ingress:19672" proxy port name=cilium-ingress-default-basic-ingress subsys=proxy # After ssh to any of k8s node, send request to Envoy proxy port directly $ curl -v http://localhost:19672 * Trying 127.0.0.1:19672... * TCP_NODELAY set * Connected to localhost (127.0.0.1) port 19672 (#0) > GET / HTTP/1.1 > Host: localhost:19672 > User-Agent: curl/7.68.0 > Accept: */* > * Mark bundle as not supporting multiuse < HTTP/1.1 503 Service Unavailable < content-length: 19 < content-type: text/plain < date: Fri, 08 Jul 2022 08:12:35 GMT < server: envoyIf you see a response similar to the above, it means that the request is being redirected to proxy successfully. The http response will have one special header
server: envoyaccordingly. The same can be observed fromhubble observecommand Observing Flows with Hubble.The most common root cause is either that the Cilium Envoy proxy is not running on the node, or there is some other issue with CEC resource provisioning.
$ kubectl exec -n kube-system ds/cilium -- cilium-dbg status
...
Controller Status:       49/49 healthy
Proxy Status:            OK, ip 10.0.0.25, 6 redirects active on ports 10000-20000
Global Identity Range:   min 256, max 65535
Assuming that the above steps are done successfully, you can proceed to send a request via an external IP or via FQDN next.
Double-check whether your backend service is up and healthy. The Envoy Discovery Service (EDS) has a name that follows the convention
<namespace>/<service-name>:<port>.$ LB_IP=$(kubectl get ingress basic-ingress -o json | jq '.status.loadBalancer.ingress[0].ip' | jq -r .) $ curl -s http://$LB_IP/details/1 no healthy upstream $ kubectl get cec cilium-ingress-default-basic-ingress -o json | jq '.spec.resources[] | select(.type=="EDS")' { "@type": "type.googleapis.com/envoy.config.cluster.v3.Cluster", "connectTimeout": "5s", "name": "default/details:9080", "outlierDetection": { "consecutiveLocalOriginFailure": 2, "splitExternalLocalOriginErrors": true }, "type": "EDS", "typedExtensionProtocolOptions": { "envoy.extensions.upstreams.http.v3.HttpProtocolOptions": { "@type": "type.googleapis.com/envoy.extensions.upstreams.http.v3.HttpProtocolOptions", "useDownstreamProtocolConfig": { "http2ProtocolOptions": {} } } } } { "@type": "type.googleapis.com/envoy.config.cluster.v3.Cluster", "connectTimeout": "5s", "name": "default/productpage:9080", "outlierDetection": { "consecutiveLocalOriginFailure": 2, "splitExternalLocalOriginErrors": true }, "type": "EDS", "typedExtensionProtocolOptions": { "envoy.extensions.upstreams.http.v3.HttpProtocolOptions": { "@type": "type.googleapis.com/envoy.extensions.upstreams.http.v3.HttpProtocolOptions", "useDownstreamProtocolConfig": { "http2ProtocolOptions": {} } } } }If everything is configured correctly, you will be able to see the flows from
world(identity 2),ingress(identity 8) and your backend pod as per below.# Flows for world identity $ kubectl exec -n kube-system ds/cilium -- hubble observe --identity 2 -f Defaulted container "cilium-agent" out of: cilium-agent, mount-cgroup (init), apply-sysctl-overwrites (init), mount-bpf-fs (init), clean-cilium-state (init) Jul 7 13:07:46.726: 192.168.49.1:59608 -> default/details-v1-5498c86cf5-cnt9q:9080 http-request FORWARDED (HTTP/1.1 GET http://10.97.60.117/details/1) Jul 7 13:07:46.727: 192.168.49.1:59608 <- default/details-v1-5498c86cf5-cnt9q:9080 http-response FORWARDED (HTTP/1.1 200 1ms (GET http://10.97.60.117/details/1)) # Flows for Ingress identity (e.g. envoy proxy) $ kubectl exec -n kube-system ds/cilium -- hubble observe --identity 8 -f Defaulted container "cilium-agent" out of: cilium-agent, mount-cgroup (init), apply-sysctl-overwrites (init), mount-bpf-fs (init), clean-cilium-state (init) Jul 7 13:07:46.726: 10.0.0.95:42509 -> default/details-v1-5498c86cf5-cnt9q:9080 to-endpoint FORWARDED (TCP Flags: SYN) Jul 7 13:07:46.726: 10.0.0.95:42509 <- default/details-v1-5498c86cf5-cnt9q:9080 to-stack FORWARDED (TCP Flags: SYN, ACK) Jul 7 13:07:46.726: 10.0.0.95:42509 -> default/details-v1-5498c86cf5-cnt9q:9080 to-endpoint FORWARDED (TCP Flags: ACK) Jul 7 13:07:46.726: 10.0.0.95:42509 -> default/details-v1-5498c86cf5-cnt9q:9080 to-endpoint FORWARDED (TCP Flags: ACK, PSH) Jul 7 13:07:46.727: 10.0.0.95:42509 <- default/details-v1-5498c86cf5-cnt9q:9080 to-stack FORWARDED (TCP Flags: ACK, PSH) # Flows for backend pod, the identity can be retrieved via cilium identity list command $ kubectl exec -n kube-system ds/cilium -- hubble observe --identity 48847 -f Defaulted container "cilium-agent" out of: cilium-agent, mount-cgroup (init), apply-sysctl-overwrites (init), mount-bpf-fs (init), clean-cilium-state (init) Jul 7 13:07:46.726: 10.0.0.95:42509 -> default/details-v1-5498c86cf5-cnt9q:9080 to-endpoint FORWARDED (TCP Flags: SYN) Jul 7 13:07:46.726: 10.0.0.95:42509 <- default/details-v1-5498c86cf5-cnt9q:9080 to-stack FORWARDED (TCP Flags: SYN, ACK) Jul 7 13:07:46.726: 10.0.0.95:42509 -> default/details-v1-5498c86cf5-cnt9q:9080 to-endpoint FORWARDED (TCP Flags: ACK) Jul 7 13:07:46.726: 10.0.0.95:42509 -> default/details-v1-5498c86cf5-cnt9q:9080 to-endpoint FORWARDED (TCP Flags: ACK, PSH) Jul 7 13:07:46.726: 192.168.49.1:59608 -> default/details-v1-5498c86cf5-cnt9q:9080 http-request FORWARDED (HTTP/1.1 GET http://10.97.60.117/details/1) Jul 7 13:07:46.727: 10.0.0.95:42509 <- default/details-v1-5498c86cf5-cnt9q:9080 to-stack FORWARDED (TCP Flags: ACK, PSH) Jul 7 13:07:46.727: 192.168.49.1:59608 <- default/details-v1-5498c86cf5-cnt9q:9080 http-response FORWARDED (HTTP/1.1 200 1ms (GET http://10.97.60.117/details/1)) Jul 7 13:08:16.757: 10.0.0.95:42509 <- default/details-v1-5498c86cf5-cnt9q:9080 to-stack FORWARDED (TCP Flags: ACK, FIN) Jul 7 13:08:16.757: 10.0.0.95:42509 -> default/details-v1-5498c86cf5-cnt9q:9080 to-endpoint FORWARDED (TCP Flags: ACK, FIN) # Sample output of cilium-dbg monitor $ ksysex ds/cilium -- cilium-dbg monitor level=info msg="Initializing dissection cache..." subsys=monitor -> endpoint 212 flow 0x3000e251 , identity ingress->61131 state new ifindex lxcfc90a8580fd6 orig-ip 10.0.0.192: 10.0.0.192:34219 -> 10.0.0.164:9080 tcp SYN -> stack flow 0x2481d648 , identity 61131->ingress state reply ifindex 0 orig-ip 0.0.0.0: 10.0.0.164:9080 -> 10.0.0.192:34219 tcp SYN, ACK -> endpoint 212 flow 0x3000e251 , identity ingress->61131 state established ifindex lxcfc90a8580fd6 orig-ip 10.0.0.192: 10.0.0.192:34219 -> 10.0.0.164:9080 tcp ACK -> endpoint 212 flow 0x3000e251 , identity ingress->61131 state established ifindex lxcfc90a8580fd6 orig-ip 10.0.0.192: 10.0.0.192:34219 -> 10.0.0.164:9080 tcp ACK -> Request http from 0 ([reserved:world]) to 212 ([k8s:io.cilium.k8s.namespace.labels.kubernetes.io/metadata.name=default k8s:io.cilium.k8s.policy.cluster=minikube k8s:io.cilium.k8s.policy.serviceaccount=bookinfo-details k8s:io.kubernetes.pod.namespace=default k8s:version=v1 k8s:app=details]), identity 2->61131, verdict Forwarded GET http://10.99.74.157/details/1 => 0 -> stack flow 0x2481d648 , identity 61131->ingress state reply ifindex 0 orig-ip 0.0.0.0: 10.0.0.164:9080 -> 10.0.0.192:34219 tcp ACK -> Response http to 0 ([reserved:world]) from 212 ([k8s:io.kubernetes.pod.namespace=default k8s:version=v1 k8s:app=details k8s:io.cilium.k8s.namespace.labels.kubernetes.io/metadata.name=default k8s:io.cilium.k8s.policy.cluster=minikube k8s:io.cilium.k8s.policy.serviceaccount=bookinfo-details]), identity 61131->2, verdict Forwarded GET http://10.99.74.157/details/1 => 200
Symptom Library
Node to node traffic is being dropped
Symptom
Endpoint to endpoint communication on a single node succeeds but communication fails between endpoints across multiple nodes.
Troubleshooting steps:
Run
cilium-health status --verboseon the node of the source and destination endpoint. It should describe the connectivity from that node to other nodes in the cluster, and to a simulated endpoint on each other node. Identify points in the cluster that cannot talk to each other. If the command does not describe the status of the other node, there may be an issue with the KV-Store.Run
cilium-dbg monitoron the node of the source and destination endpoint. Look for packet drops.When running in Encapsulation mode:
Run
cilium-dbg bpf tunnel listand verify that each Cilium node is aware of the other nodes in the cluster. If not, check the logfile for errors.If nodes are being populated correctly, run
tcpdump -n -i cilium_vxlanon each node to verify whether cross node traffic is being forwarded correctly between nodes.If packets are being dropped,
verify that the node IP listed in
cilium-dbg bpf tunnel listcan reach each other.verify that the firewall on each node allows UDP port 8472.
When running in Native-Routing mode:
Run
ip routeor check your cloud provider router and verify that you have routes installed to route the endpoint prefix between all nodes.Verify that the firewall on each node permits to route the endpoint IPs.
Useful Scripts
Retrieve Cilium pod managing a particular pod
Identifies the Cilium pod that is managing a particular pod in a namespace:
k8s-get-cilium-pod.sh <pod> <namespace>
Example:
$ curl -sLO https://raw.githubusercontent.com/cilium/cilium/main/contrib/k8s/k8s-get-cilium-pod.sh
$ chmod +x k8s-get-cilium-pod.sh
$ ./k8s-get-cilium-pod.sh luke-pod default
cilium-zmjj9
cilium-node-init-v7r9p
cilium-operator-f576f7977-s5gpq
Execute a command in all Kubernetes Cilium pods
Run a command within all Cilium pods of a cluster
k8s-cilium-exec.sh <command>
Example:
$ curl -sLO https://raw.githubusercontent.com/cilium/cilium/main/contrib/k8s/k8s-cilium-exec.sh
$ chmod +x k8s-cilium-exec.sh
$ ./k8s-cilium-exec.sh uptime
 10:15:16 up 6 days,  7:37,  0 users,  load average: 0.00, 0.02, 0.00
 10:15:16 up 6 days,  7:32,  0 users,  load average: 0.00, 0.03, 0.04
 10:15:16 up 6 days,  7:30,  0 users,  load average: 0.75, 0.27, 0.15
 10:15:16 up 6 days,  7:28,  0 users,  load average: 0.14, 0.04, 0.01
List unmanaged Kubernetes pods
Lists all Kubernetes pods in the cluster for which Cilium does not provide networking. This includes pods running in host-networking mode and pods that were started before Cilium was deployed.
k8s-unmanaged.sh
Example:
$ curl -sLO https://raw.githubusercontent.com/cilium/cilium/main/contrib/k8s/k8s-unmanaged.sh
$ chmod +x k8s-unmanaged.sh
$ ./k8s-unmanaged.sh
kube-system/cilium-hqpk7
kube-system/kube-addon-manager-minikube
kube-system/kube-dns-54cccfbdf8-zmv2c
kube-system/kubernetes-dashboard-77d8b98585-g52k5
kube-system/storage-provisioner
Reporting a problem
Before you report a problem, make sure to retrieve the necessary information from your cluster before the failure state is lost.
Automatic log & state collection
Install the latest version of the Cilium CLI. The Cilium CLI can be used to install Cilium, inspect the state of a Cilium installation, and enable/disable various features (e.g. clustermesh, Hubble).
CILIUM_CLI_VERSION=$(curl -s https://raw.githubusercontent.com/cilium/cilium-cli/main/stable.txt)
CLI_ARCH=amd64
if [ "$(uname -m)" = "aarch64" ]; then CLI_ARCH=arm64; fi
curl -L --fail --remote-name-all https://github.com/cilium/cilium-cli/releases/download/${CILIUM_CLI_VERSION}/cilium-linux-${CLI_ARCH}.tar.gz{,.sha256sum}
sha256sum --check cilium-linux-${CLI_ARCH}.tar.gz.sha256sum
sudo tar xzvfC cilium-linux-${CLI_ARCH}.tar.gz /usr/local/bin
rm cilium-linux-${CLI_ARCH}.tar.gz{,.sha256sum}
CILIUM_CLI_VERSION=$(curl -s https://raw.githubusercontent.com/cilium/cilium-cli/main/stable.txt)
CLI_ARCH=amd64
if [ "$(uname -m)" = "arm64" ]; then CLI_ARCH=arm64; fi
curl -L --fail --remote-name-all https://github.com/cilium/cilium-cli/releases/download/${CILIUM_CLI_VERSION}/cilium-darwin-${CLI_ARCH}.tar.gz{,.sha256sum}
shasum -a 256 -c cilium-darwin-${CLI_ARCH}.tar.gz.sha256sum
sudo tar xzvfC cilium-darwin-${CLI_ARCH}.tar.gz /usr/local/bin
rm cilium-darwin-${CLI_ARCH}.tar.gz{,.sha256sum}
See the full page of releases.
Then, execute cilium sysdump command to collect troubleshooting information
from your Kubernetes cluster:
cilium sysdump
Note that by default cilium sysdump will attempt to collect as much logs as
possible and for all the nodes in the cluster. If your cluster size is above 20
nodes, consider setting the following options to limit the size of the sysdump.
This is not required, but useful for those who have a constraint on bandwidth or
upload size.
set the
--node-listoption to pick only a few nodes in case the cluster has many of them.set the
--logs-since-timeoption to go back in time to when the issues started.set the
--logs-limit-bytesoption to limit the size of the log files (note: passed ontokubectl logs; does not apply to entire collection archive).
Ideally, a sysdump that has a full history of select nodes, rather than a brief
history of all the nodes, would be preferred (by using --node-list). The second
recommended way would be to use --logs-since-time if you are able to narrow down
when the issues started. Lastly, if the Cilium agent and Operator logs are too
large, consider --logs-limit-bytes.
Use --help to see more options:
cilium sysdump --help
Single Node Bugtool
If you are not running Kubernetes, it is also possible to run the bug collection tool manually with the scope of a single node:
The cilium-bugtool captures potentially useful information about your
environment for debugging. The tool is meant to be used for debugging a single
Cilium agent node. In the Kubernetes case, if you have multiple Cilium pods,
the tool can retrieve debugging information from all of them. The tool works by
archiving a collection of command output and files from several places. By
default, it writes to the tmp directory.
Note that the command needs to be run from inside the Cilium pod/container.
cilium-bugtool
When running it with no option as shown above, it will try to copy various
files and execute some commands. If kubectl is detected, it will search for
Cilium pods. The default label being k8s-app=cilium, but this and the
namespace can be changed via k8s-namespace and k8s-label respectively.
If you want to capture the archive from a Kubernetes pod, then the process is a bit different
$ # First we need to get the Cilium pod
$ kubectl get pods --namespace kube-system
NAME                          READY     STATUS    RESTARTS   AGE
cilium-kg8lv                  1/1       Running   0          13m
kube-addon-manager-minikube   1/1       Running   0          1h
kube-dns-6fc954457d-sf2nk     3/3       Running   0          1h
kubernetes-dashboard-6xvc7    1/1       Running   0          1h

$ # Run the bugtool from this pod
$ kubectl -n kube-system exec cilium-kg8lv -- cilium-bugtool
[...]

$ # Copy the archive from the pod
$ kubectl cp kube-system/cilium-kg8lv:/tmp/cilium-bugtool-20180411-155146.166+0000-UTC-266836983.tar /tmp/cilium-bugtool-20180411-155146.166+0000-UTC-266836983.tar
[...]
Note
Please check the archive for sensitive information and strip it away before sharing it with us.
Below is an approximate list of the kind of information in the archive.
Cilium status
Cilium version
Kernel configuration
Resolve configuration
Cilium endpoint state
Cilium logs
Docker logs
dmesgethtoolip aip linkip riptables-savekubectl -n kube-system get podskubectl get pods,svc for all namespacesunameuptimecilium-dbg bpf * listcilium-dbg endpoint get for each endpointcilium-dbg endpoint listhostnamecilium-dbg policy getcilium-dbg service list
Debugging information
If you are not running Kubernetes, you can use the cilium-dbg debuginfo command
to retrieve useful debugging information. If you are running Kubernetes, this
command is automatically run as part of the system dump.
cilium-dbg debuginfo can print useful output from the Cilium API. The output
format is in Markdown format so this can be used when reporting a bug on the
issue tracker. Running without arguments will print to standard output, but
you can also redirect to a file like
cilium-dbg debuginfo -f debuginfo.md
Note
Please check the debuginfo file for sensitive information and strip it away before sharing it with us.
Slack assistance
The Cilium Slack community is a helpful first point of assistance to get help troubleshooting a problem or to discuss options on how to address a problem. The community is open to anyone.
Report an issue via GitHub
If you believe to have found an issue in Cilium, please report a GitHub issue and make sure to attach a system dump as described above to ensure that developers have the best chance to reproduce the issue.